Guest user checkout
This page describes how to embed a Full Featured Card Element on your payment page to accept payments.
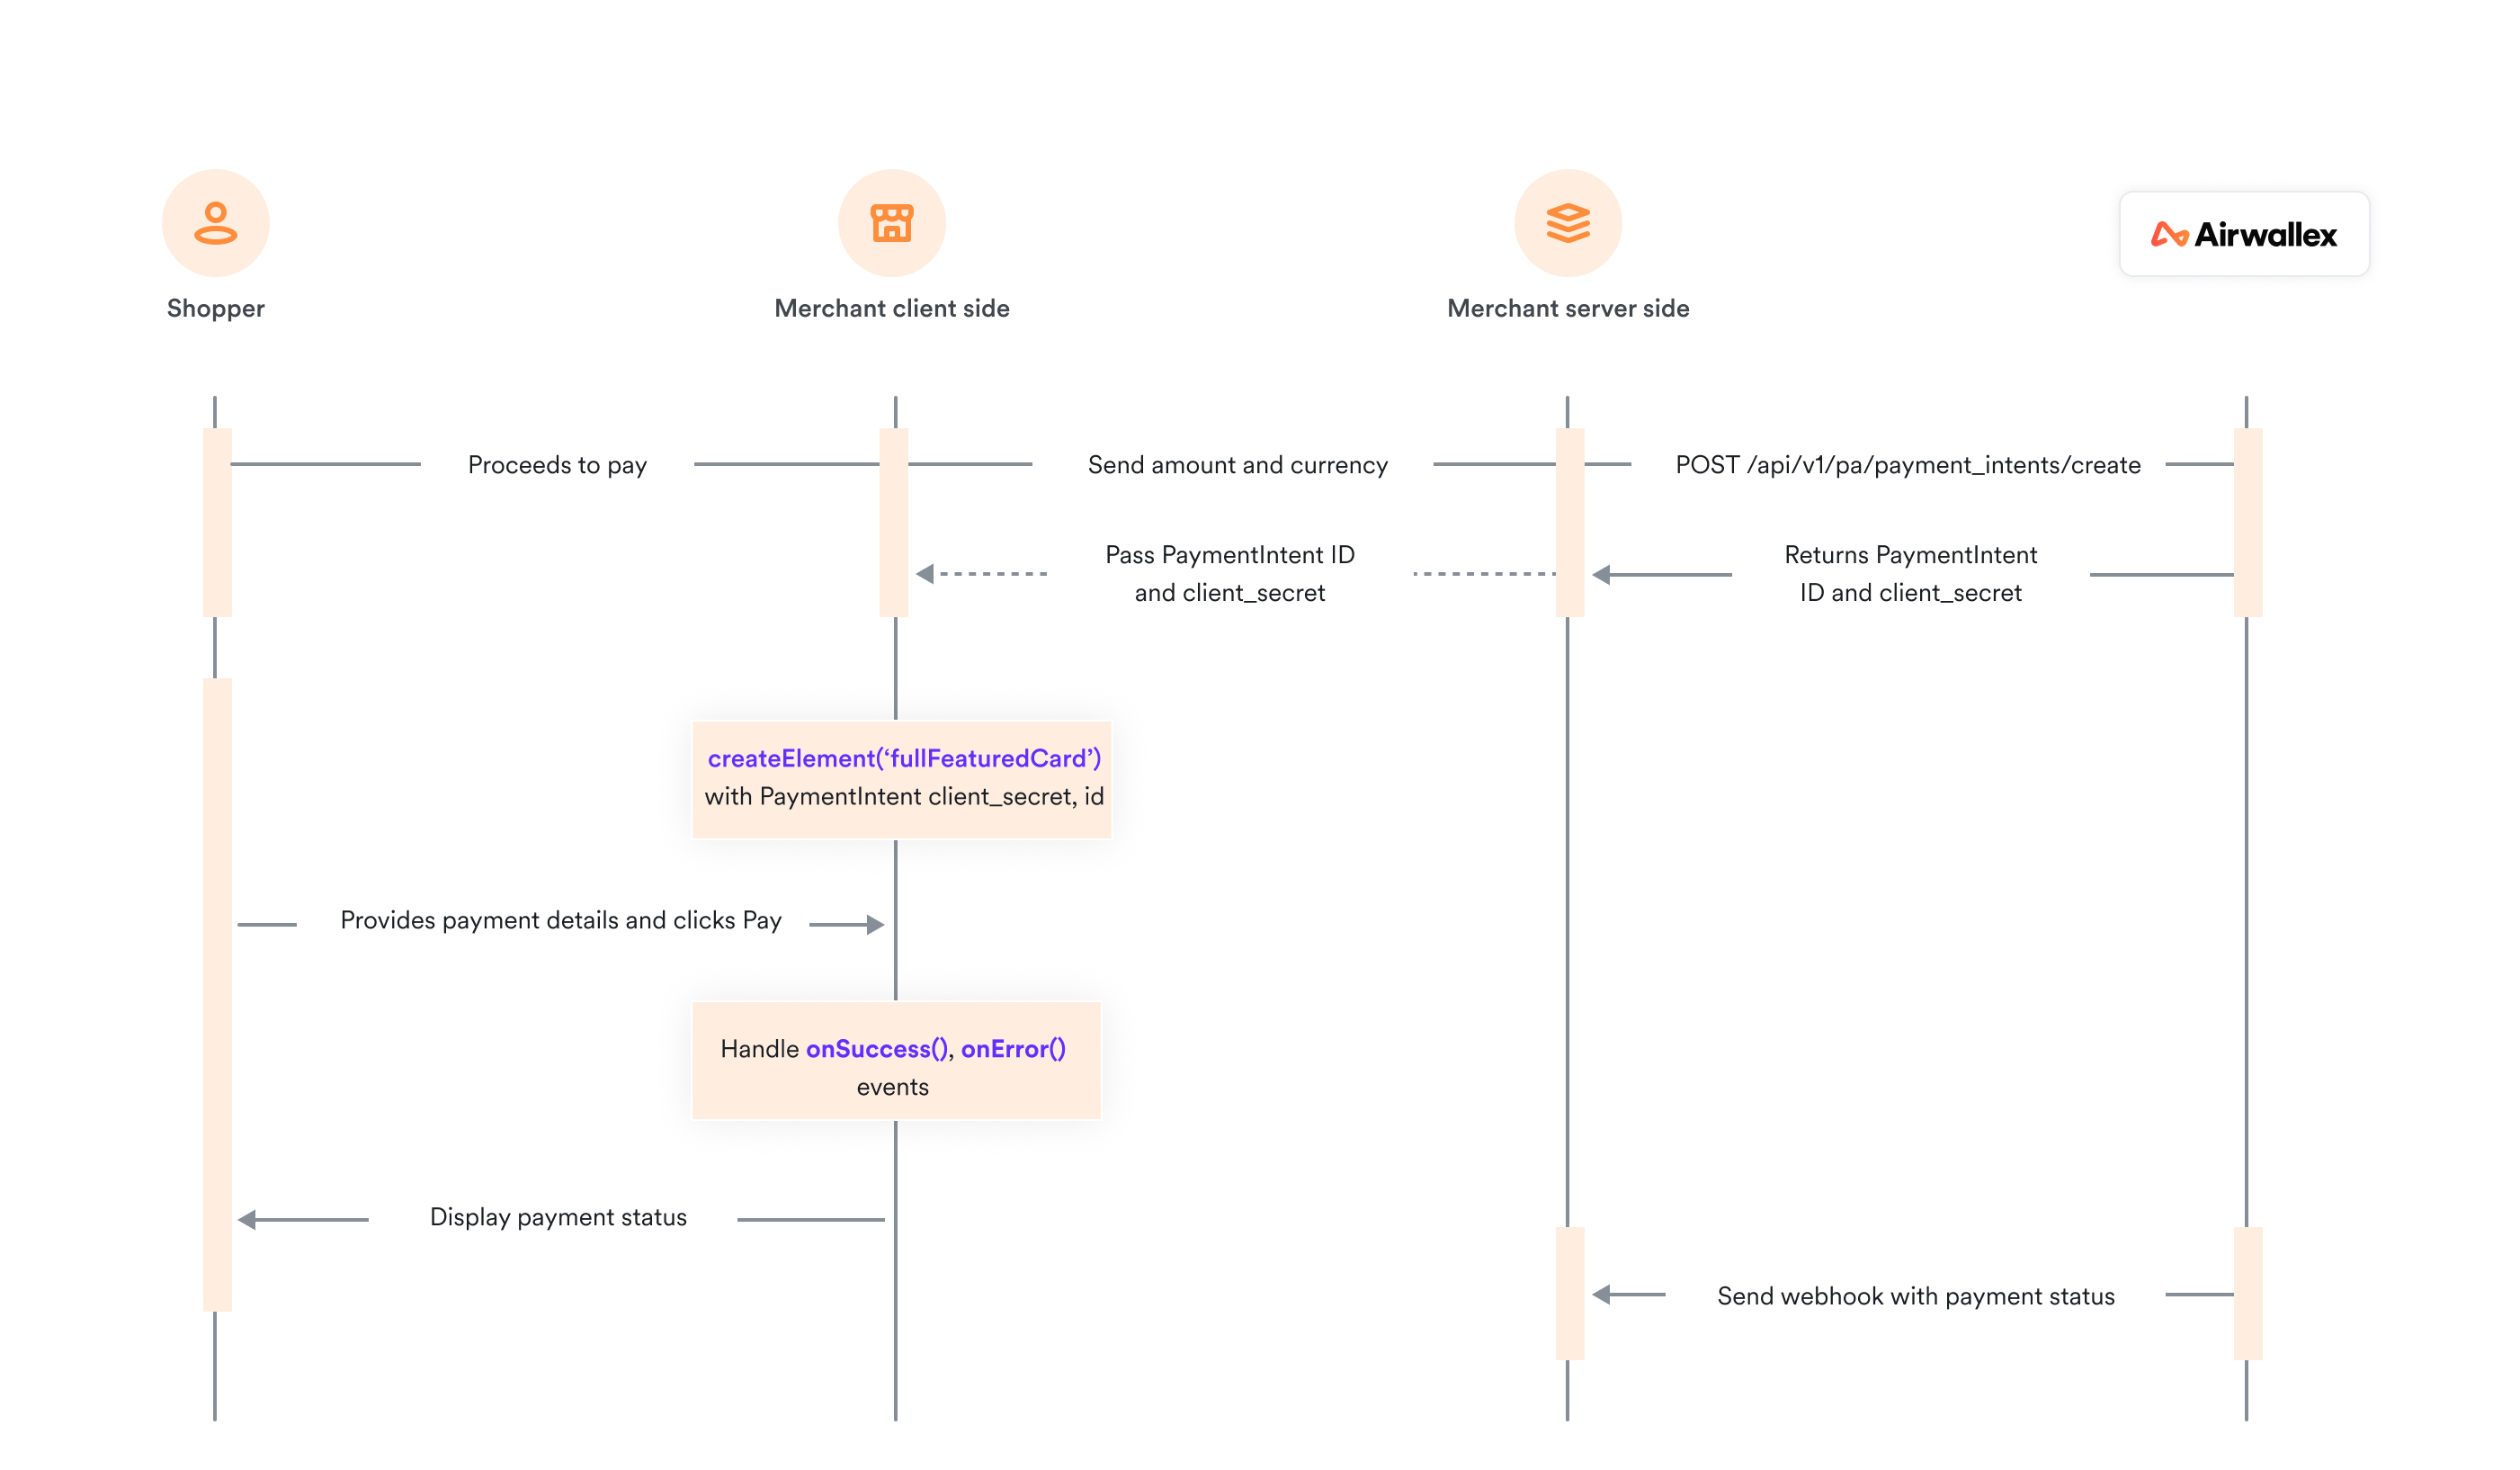
How it works
The diagram below depicts the information flow in a Full Featured Card Element integration.
Before you begin
Before you implement the integration, consider the following:
-
Ensure your Airwallex account is activated for online payments.
-
Obtain your access token API by authenticating to Airwallex using your unique Client ID and API key. You will need the access token to make API calls.
-
Explore the
airwallex-payment-elementsJavaScript client library reference to familiarize yourself with the Embedded Elements methods, parameters, and properties. -
Install the package
- Using Yarn or NPM
yarn add airwallex-payment-elementsnpm install airwallex-payment-elements
- Using CDN
<script src="https://checkout.airwallex.com/assets/elements.bundle.min.js"></script>
- Using Yarn or NPM
Step 1: Set up the server to create a PaymentIntent
When the shopper begins the checkout process, you will need to create a PaymentIntent object to indicate your intent to collect payment from the shopper.
When the checkout page loads, on your server, call Create a PaymentIntent API with an amount and currency. Always decide how much to charge on the server side, a trusted environment, as opposed to the client. This prevents malicious shoppers from being able to alter the payment amount.
Provide return_url in Create a PaymentIntent API to indicate where Airwallex should redirect the shopper after completing the payment, whether successful or otherwise.
The PaymentIntent's id and client_secret are returned in the response — these parameters let you confirm the payment and update card details on the client, without allowing manipulation of sensitive information, like payment amount.
Shell1curl --request POST \2--url 'https://api-demo.airwallex.com/api/v1/pa/payment_intents/create' \3--header 'Content-Type: application/json' \4--header 'Authorization: Bearer <your_bearer_token>' \5--data-raw '{6 "request_id": "00e8df19-7087-4209-b50b-067d6a39ee72",7 "amount": 100,8 "currency": "CNY",9 "merchant_order_id": "Merchant_Order_a7f9baf8-884a-4def-ba85-d1f9be83470a",10 "return_url": "http://www.merchant.com/result"11}'
Step 2: Initialize legacy Airwallex element on your checkout page
First, you will need to import the legacy airwallex-payment-elements SDK and then initialize the package. For details, see Initialize Airwallex .
Step 3: Add the Full Featured Card Element to your checkout page
To embed the Full Featured Card Element into your checkout page, you will need to create an empty container, create the Element and then mount the Element to the container.
Define the payment form
First, create an empty container div with a unique id in your payment form. Ensure that the payment form only contains one Element with this unique id. Airwallex inserts an iframe into this div on mounting the Element.
HTML1<div id="full-featured-card"></div>
Create the Full Featured Card Element
When the payment form has loaded, call createElement(type, options) by specifying the Element type as fullFeaturedCard to create the Element. Ensure that the payment form only contains one Element with fullFeaturedCard id.
JavaScript1const element = Airwallex.createElement('fullFeaturedCard', {2 intent: {3 // Required, fullFeaturedCard uses intent_id and client_secret to prepare checkout4 id: 'replace-with-your-intent-id',5 client_secret: 'replace-with-your-client-secret',6 },7});
Mount the Full Featured Card Element
Call mount() with the id of the div to mount the Element to the DOM. This creates a multi-line input container that collects the card number, expiry date, CVC, name on card, and the checkout button. The Element should only be mounted once in a single payment flow.
JavaScript1element.mount('full-featured-card'); // Injects iframe into the Full Featured Card Element container
Add onReady event listener to ensure the Element is mounted. Use this event to prepare and load the checkout page.
JavaScript1 window.addEventListener('onReady', (event) => {2 /*3 ... Handle event4 */5 window.alert(event.detail);6 });
Full Featured Card props
You can also pass options in createElement() to overwrite styles and other functions as shown in the following table. All properties are optional. For details, see fullFeaturedCard props .
Step 4: Handle the response
Add success and error event listeners to handle error and success events received from Airwallex.
JavaScript1const element = mount('dropIn');2element.on('success', (event) => {3 // Handle event on success4});56element.on('error', (event) => {7 // Handle event on error8});
If no error occurred, display a message that the payment was successful. If payment fails with an error, display the appropriate message to your shopper so they can take action and try again.
Retrieve the payment result
For any actions subsequent to the payment such as shipping goods or sending email receipts, you can retrieve the payment result using the following options:
-
Set up webhooks to receive notifications on whether the payment has succeeded. Airwallex sends
payment_intent.succeededevent when a payment succeeds. Listen to these events rather than waiting on a callback from the client. On the client, the shopper could close the browser window or quit the app before the callback executes. For information on how to set up webhooks and listen to events, see Getting started with webhooks -
On your server, call Retrieve a PaymentIntent API to check the PaymentIntent status.
-
Check Payment Activity screen on your Airwallex web app.
Test your integration
Use test card numbers and the test and go-live checklist to test your integration for various success and error scenarios in the sandbox environment and then go live in the production environment.
Example integrations
Explore a full, working code sample of an integration built using various web frameworks .
Supported features
You can use the following features in your Drop-in Element integration.
Style and appearance customization
You can customize the look and feel of the Drop-in Element JS using the following objects: appearance JS and layout JS.
theme and style objects have been deprecated in @airwallex/components-sdk version 1.19.1, use the enhanced appearance object instead.
appearance
You can customize the appearance of your Element to match the design of your website using the following customization options:
-
mode: The appearance mode for the Element. Acceptsdarkorlightmodes where each mode provides a different color variable preset and color generation logic. Defaults tolight. -
variables: Set variables to customize the appearance of the Element. Supports three color keys that accept RGB or HEX color formats.colorBackground: Sets the primary text color. This option automatically generates a comprehensive color set, including secondary text, inverse text, disabled text, placeholder text, and more. Defaults to#14171a(light mode) and#F5F6F7(dark mode).colorBrand: Sets the main accent color used for Elements such as buttons, text links, focus borders, interactive backgrounds, highlights, etc. This color defines your brand's visual identity in the Element. Defaults to#612fff(light mode) and#ABA8FF(dark mode).colorText: Sets the primary background color. This option alautomatically generates a complete set of background colors, including primary, secondary, field, and disabled backgrounds. Defaults to#ffffff(light mode) and#14171A(dark mode).
-
rules: Fine tune individual Elements and states by specifying custom CSS properties using rules. The following classes and pseudo-classes can be styled using rules..Button: CSSProperties.Button:hover: CSSProperties.GooglePayButton: CSSProperties.GooglePayButton:hover: CSSProperties.ApplePayButton: CSSProperties.ApplePayButton:hover: CSSProperties.Input: CSSProperties.Input:hover: CSSProperties.Input:active: CSSProperties
JavaScript1createElement('dropin', {2 appearance: {3 mode: 'dark',4 variables: {5 colorBrand: '#612FFF',6 colorBackground: '#14171A',7 colorText: '#FFFFFF',8 },9 rules: {10 '.Button': {11 width: '100px',12 height: '40px',13 }14 }15 },16});
layout
The layout object supports two options:
alwaysShowMethodLabel: By default (false), the payment method icon is hidden when only one payment method is available. Set totrueto always display the payment method icon.type: Specify the layout for the payment elements. Defaults toaccordionandtablayout on desktop and mobile interfaces respectively.
JavaScript1createElement("dropIn", {2 intent_id: intent.id,3 client_secret: intent.client_secret,4 layout: {5 type: "accordion"6 }7 currency: 'USD',8});
Accordion layout on Desktop  | Accordion layout on Mobile |
Tab layout on Desktop  | Tab layout on Mobile 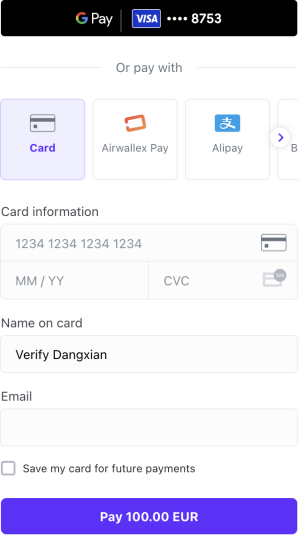 |
style (deprecated)
Provide base styling for the iframe using CSS properties. You can also customize the width and height of a pop-up overlay, e.g., payment with 3-D Secure authentication.
JavaScript1createElement('dropIn', {2 style: {3 base: {4 border: '5px solid red',5 borderRadius: '4px',6 background: 'black',7 },8 popupWidth: 400,9 popupHeight: 600,10 },11})
Localization
You can configure the Element to display localized text for payment fields based on the locale specified in init(). If no locale is specified, the browser's locale will be used, if it is supported by Airwallex.js. For a list of supported locales, see locales JS.
If the browser's locale is not supported, the Element will default to en.
Save card details for future payments
Airwallex allows you to create a PaymentConsent with the shopper to initiate future payments using shopper's saved card details. For more information, see Save payment details for future payments.
3D Secure authentication
Airwallex automatically handles 3D Secure authentication offering either frictionless or challenge flow depending on the card issuer's requirements. You can optionally pass the following fields in createElement() to support 3DS:
authFormContainerJS: A container for the authentication form. If a challenge flow is required to authenticate the shopper, an iframe will be rendered in this container to display the authentication page provided by the issuing bank. If not provided, Airwallex will create adivafterbodytag and use it as the container.withBillingJS: If applicable set this totrueto collect billing information from the shopper, which increases the likelihood of frictionless checkout.
Device fingerprinting
Device fingerprinting uniquely tracks and identifies devices used for transacting on your shopping site, increasing your protection from fraud. Airwallex.js automatically handles device fingerprinting, so no additional integration is needed.
Payments for platforms
You can accept payments as a platform via Drop-in Element. Example platforms include marketplaces, SaaS platforms, on-demand service providers. For more information on payments for platforms with Airwallex as an acquirer, see Airwallex payment gateway.
If you want the shopper to see the available payment methods activated by the connected account, specify the Connected Account ID in the platformConnectedAccount field in createElement().
To use Connected Account information to process the payment, e.g., statement descriptor displayed on the shopper's credit card or bank statement, provide connected_account_id in Create a Payment Intent API.
Fraud protection
You can provide specific data fields in Create a PaymentIntent API and Confirm a Payment Intent API endpoints to significantly improve Airwallex's fraud protection performance, ultimately boosting conversion rates and minimizing fraud risk. For more information, see Enhance fraud protection with comprehensive payment data.
Payment errors
The following errors are specific to payment Elements, Hosted Payment Page, Drop-in Element, Card Element, Split Card Element, Apple Pay Element, or Google Pay Element.
| Error code | Error message | Next steps |
|---|---|---|
| unauthorized | Access denied, authentication failed. | Regenerate the access token and re-authenticate to Airwallex. |
| awx_pay_error | Your payment was declined. Please try a different account or choose another payment method. | Retry with another payment method and if the issue persists, try a different account. |
| custom_code | Your current bank account balance is ${balanceAmount} EUR. To complete your payment, please add sufficient funds or choose a different account. | Add sufficient funds to your bank account or choose a different bank account. |
| resource_not_found | ${resourceID} cannot be found. Note: Resource may be either Payment Intent or Customer. | Provide a valid identifier for Payment Intent or Customer. |
| required | ${inputName} is required. | Provide values for the required checkout fields. |
| invalid | ${inputName} is invalid. | Ensure values provided in the checkout fields are valid. |
| un_support | This card is not supported for payment. Please specify a different card. | Try payment with a different card. See supported card payment methods. |
| expired | The card's expiration date cannot be in the past. Please enter a valid expiration date. | Check the card expiry date and ensure the value is valid. |
| no_payment_methods | No available payment methods. Please contact support to enable payment methods. | See supported card payment methods. |