

Install the WooCommerce plugin
Install, connect, and configure the Airwallex Online Payments plugin for your WooCommerce store.
To accept payments with Airwallex on your WooCommerce store, install and activate the Airwallex Online Payments plugin, then connect it to your Airwallex account.
Before you begin
- You have a WooCommerce store running WordPress 4.5 or higher and WooCommerce 3.0 or higher.
- You have PHP 7.3 or higher installed on your server.
- You have administrator access to the WordPress Admin.
- You have an Airwallex account with your desired payment methods activated under Payments > Payment Methods in the Airwallex WebApp.
- You have your Airwallex API credentials (Client ID, API key, and Webhook Secret Key) for your target environment. To find your credentials, log in to the Airwallex WebApp and go to Settings > Developer > API keys. We recommend using a scoped API key with "Edit" and "View" permissions under Payment Acceptance.
Activate payment methods first
Ensure your preferred payment methods are activated in your Airwallex account before installing and configuring the plugin. The plugin validates that payment methods are activated before they can be enabled.
Install the plugin
You can install the plugin from the WooCommerce Marketplace or from the WordPress plugin directory.
Install from the WooCommerce Marketplace
-
Go to the Airwallex Online Payments plugin page and click Add to store.
-
After completing the checkout process, click Add to site.
-
Enter your website URL.
-
Authorize the connection.
Install from the WordPress plugin directory
-
In the WordPress Admin, go to Plugins > Add New.
-
Search for Airwallex.
-
Click Install Now and then Activate.
Connect your Airwallex account
After installing and activating the plugin, connect it to your Airwallex account. There are two connection methods: OAuth log-in (recommended) or manual API key entry.
Connect via Airwallex log-in
-
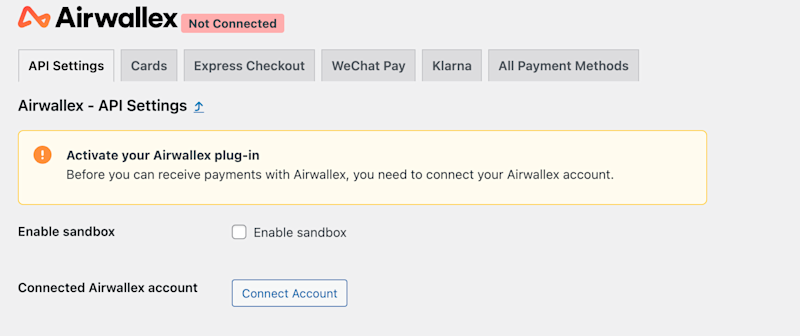
In the WordPress Admin, go to WooCommerce > Settings > Payments > Airwallex.
-
On the API Settings tab, click Connect Account.
-
Log in using your Airwallex credentials.
-
After a successful connection, the plugin displays a green "Connected" status next to the Airwallex logo.
-
Click Save changes.
Connection issues
The connection may fail if your store URL does not match the URL provided during account registration. In this case, connect using your API keys instead.
Connect via API keys
Use this method if the Airwallex log-in is not available or you prefer API key authentication. When you connect this way, you must also create a webhook so that Airwallex can notify your store about payment events.
Before you start, make sure you have your Airwallex API credentials (Client ID and API key). To find them, log in to the Airwallex web app and go to Settings > Developer > API keys.
-
In the WordPress Admin, go to WooCommerce > Settings > Payments > Airwallex.
-
On the API Settings tab, check Connect with API keys to use API key authentication instead of the OAuth connection flow.
-
Enter your Unique Client ID and API Key.
-
Create a webhook in the Airwallex web app and paste the generated key into the Webhook Secret field. Follow the steps in the next section.
-
Click Connect with API key.
-
Click Save changes.
Create a webhook
You only need to create a webhook when you connect via API keys. If you connect via Airwallex log-in, webhooks are configured automatically and you can skip this step.
Webhooks let Airwallex notify your store about asynchronous payment events, such as successful payments and refunds, so that WooCommerce order statuses stay in sync with the payment status.
-
On the API Settings tab, copy the webhook URL displayed below the Webhook Secret field. It has the following format:
text1https://your-store.com/wc-api/airwallex_webhook/ -
Log in to the Airwallex web app.
-
Go to Settings > Developer > Webhooks and add a new webhook.
-
Paste the copied URL into the Notification URL field.
-
Under Payments, subscribe to the following event groups:
- All events in Payment Intents.
- All events in Refund.
-
Save the webhook configuration.
-
Copy the Webhook Secret Key that Airwallex generates and paste it into the Webhook Secret field on the plugin's API Settings tab.
Sandbox and production webhooks
Create a separate webhook for each environment. Register the webhook in your Airwallex Sandbox account for testing and in your production account when you go live.
Configure API settings
The API Settings tab includes additional configuration options:
| Setting | Description |
|---|---|
| Enable sandbox | Toggle to use sandbox (demo) credentials for testing. When enabled, use your Airwallex Demo account Client ID and API key. |
| Temporary order status after decline | The order status set when a payment is declined and the shopper is redirected to retry. Options: Pending payment, Failed. |
| Order state for pending payments | Order status for asynchronous payment methods (for example, local payment methods with delayed confirmation). |
| Order state for authorized payments | Order status for payments that are authorized but not yet captured. |
| Scheduled job interval | How often the plugin checks for unresolved payments. Default: every hour. |
| Activate remote logging | Send diagnostic data to Airwallex to help troubleshoot issues. |
| Payment form template | Choose between Default or WordPress page shortcodes for theme compatibility. |
| Statement descriptor | Text displayed on the shopper's bank statement. Use %order% as a placeholder for the order ID. Maximum 28 characters. |
Enable sandbox mode for testing
To test your integration before going live, complete these steps:
-
On the API Settings tab, check Enable sandbox.
-
Connect your Airwallex Sandbox account using one of the connection methods above. To create a sandbox account, go to www.sandbox.airwallex.com/signup. For more information, see the sandbox environment overview.
-
Click Save changes.
-
Place test orders using Airwallex test card numbers.
-
When you are ready to go live, uncheck Enable sandbox and connect your production Airwallex account. Remember to click Save changes.
Next steps
Now that you have installed and connected the plugin, enable and configure the payment methods you want to offer: