Drop-in Element
The Drop-in Element is a UI component that lets you accept multiple payment methods with a single integration. Whether you’re just collecting card payments or using multiple payment methods, the Drop-in Element provides an easy solution to build a customised payments experience. Accepting more payment methods can help your business expand its global reach and improve checkout conversion.
Key features include:
-
Automatically adjusts input fields to collect information based on the payment method and country.
-
Reduces friction for card payments with input validation, styling and error handling.
-
Adds new payment methods to your payment form without requiring code changes in your integration.
To view the checkout experience offered by the Drop-in Element, go to the Airwallex demo book store , add items to your shopping cart and click Checkout.
Checkout flow
If you want to offer a one-off or single payment experience where the shopper is present and active on your shop site, see Guest user checkout.
If you want to save shopper's payment details for future payments, see Registered user checkout.
Supported features
You can use the following features in your Drop-in Element integration.
Style and appearance customization
You can customize the look and feel of the Drop-in Element JS using the following objects: appearance JS and layout JS.
theme and style objects have been deprecated in @airwallex/components-sdk version 1.19.1, use the enhanced appearance object instead.
appearance
You can customize the appearance of your Element to match the design of your website using the following customization options:
-
mode: The appearance mode for the Element. Acceptsdarkorlightmodes where each mode provides a different color variable preset and color generation logic. Defaults tolight. -
variables: Set variables to customize the appearance of the Element. Supports three color keys that accept RGB or HEX color formats.colorBackground: Sets the primary text color. This option automatically generates a comprehensive color set, including secondary text, inverse text, disabled text, placeholder text, and more. Defaults to#14171a(light mode) and#F5F6F7(dark mode).colorBrand: Sets the main accent color used for Elements such as buttons, text links, focus borders, interactive backgrounds, highlights, etc. This color defines your brand's visual identity in the Element. Defaults to#612fff(light mode) and#ABA8FF(dark mode).colorText: Sets the primary background color. This option automatically generates a complete set of background colors, including primary, secondary, field, and disabled backgrounds. Defaults to#ffffff(light mode) and#14171A(dark mode).
-
rules: Fine tune individual Elements and states by specifying custom CSS properties using rules. The following classes and pseudo-classes can be styled using rules..Button:CSSProperties.Button:hover:CSSProperties.GooglePayButton:CSSProperties.GooglePayButton:hover:CSSProperties.ApplePayButton:CSSProperties.ApplePayButton:hover:CSSProperties.Input:CSSProperties.Input:hover:CSSProperties.Input:active:CSSProperties
1createElement('dropin', {2 appearance: {3 mode: 'dark',4 variables: {5 colorBrand: '#612FFF',6 colorBackground: '#14171A',7 colorText: '#FFFFFF',8 },9 rules: {10 '.Button': {11 width: '100px',12 height: '40px',13 }14 }15 },16});
layout
The layout object supports two options:
alwaysShowMethodLabel: By default (false), the payment method icon is hidden when only one payment method is available. Set totrueto always display the payment method icon.type: Specify the layout for the payment elements. Defaults toaccordionandtablayout on desktop and mobile interfaces respectively.
1createElement("dropIn", {2 intent_id: intent.id,3 client_secret: intent.client_secret,4 layout: {5 type: "accordion"6 }7 currency: 'USD',8});
Accordion layout on Desktop 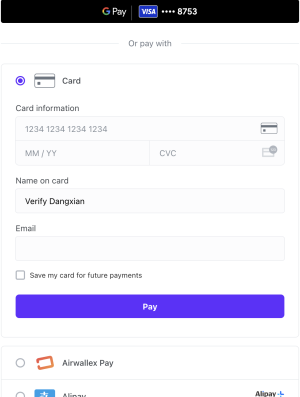 | Accordion layout on Mobile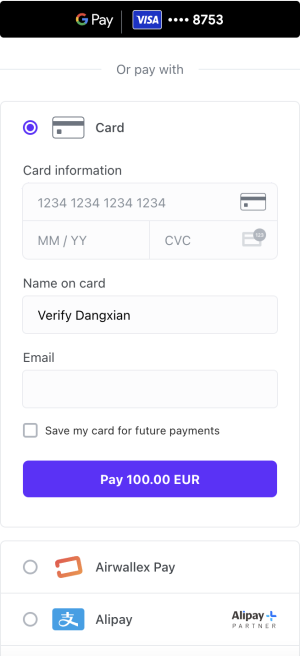 |
Tab layout on Desktop 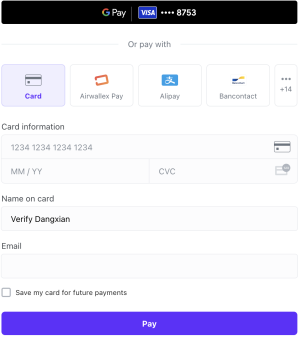 | Tab layout on Mobile 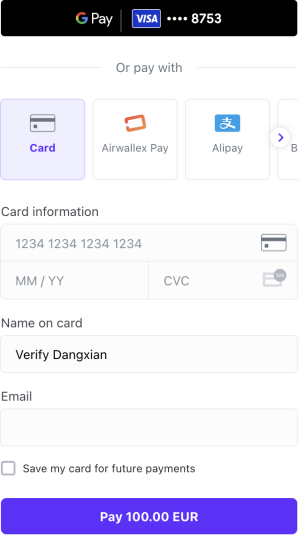 |
style (deprecated)
Provide base styling for the iframe using CSS properties. You can also customize the width and height of a pop-up overlay, e.g., payment with 3-D Secure authentication.
1createElement('dropIn', {2 style: {3 base: {4 border: '5px solid red',5 borderRadius: '4px',6 background: 'black',7 },8 popupWidth: 400,9 popupHeight: 600,10 },11})
Localization
You can configure the Element to display localized text for payment fields based on the locale specified in init(). If no locale is specified, the browser's locale will be used, if it is supported by Airwallex.js. For a list of supported locales, see locales JS.
If the browser's locale is not supported, the Element will default to en.
Save card details for future payments
Airwallex allows you to create a PaymentConsent with the shopper to initiate future payments using shopper’s saved card details. For more information, see Save payment details for future payments.
3D Secure authentication
Airwallex automatically handles 3D Secure authentication offering either frictionless or challenge flow depending on the card issuer’s requirements. You can optionally pass the following fields in createElement() to support 3DS:
authFormContainerJS: A container for the authentication form. If a challenge flow is required to authenticate the shopper, an iframe will be rendered in this container to display the authentication page provided by the issuing bank. If not provided, Airwallex will create adivafterbodytag and use it as the container.withBillingJS: If applicable set this totrueto collect billing information from the shopper, which increases the likelihood of frictionless checkout.
Device fingerprinting
Device fingerprinting uniquely tracks and identifies devices used for transacting on your shopping site, increasing your protection from fraud. Airwallex.js automatically handles device fingerprinting, so no additional integration is needed.
Payments for platforms
You can accept payments as a platform via Drop-in Element. Example platforms include marketplaces, SaaS platforms, on-demand service providers. For more information on payments for platforms with Airwallex as an acquirer, see Airwallex payment gateway.
If you want the shopper to see the available payment methods activated by the connected account, specify the Connected Account ID in the platformConnectedAccount field in createElement().
To use Connected Account information to process the payment, e.g., statement descriptor displayed on the shopper's credit card or bank statement, provide connected_account_id in Create a Payment Intent API.
Fraud protection
You can provide specific data fields in Create a PaymentIntent API and Confirm a Payment Intent API endpoints to significantly improve Airwallex's fraud protection performance, ultimately boosting conversion rates and minimizing fraud risk. For more information, see Enhance fraud protection with comprehensive payment data.
FAQ
What payment methods are supported in a Drop-in Element integration?
By default, all payment methods activated on your Airwallex merchant account are available to the shopper. To retrieve the list of payment methods supported for your account, call Get available payment method types API.
The payment methods displayed on the payment page will be filtered based on the following fields:
For details on which currencies and countries are supported for each payment method, including integration information, refer to the Payment Methods section.
By default, the order of payment methods on the payment page will be based on the order configured in Get available payment method types API, with applepay, googlepay and paypal displayed at the top if they're supported.
If you want to further restrict the payment methods offered to your shoppers, you can pass the methods[] JS field in createElement(). The payment methods will appear in the order specified in this field.
Can I offer Apple Pay via Drop-in Element integration?
Yes, Apple Pay is supported via Drop-in integration. Ensure that your merchant account is enabled for Apple Pay and you have added your domain information on the Airwallex web app > Payments > Settings. For more information, see Enable Apple Pay. Once registered, you can pass applePayRequestOptions JS in createElement to offer Apple Pay. Note that countryCode is mandatory.
1const dropInElement = createElement('dropIn', {2 intent_id: intent.id,3 client_secret: intent.client_secret,4 applePayRequestOptions: {5 countryCode: 'US',6 buttonType: 'buy',7 buttonColor: 'white-with-line',8 },9 currency: 'USD',10});
Can I offer Google Pay via Drop-in Element integration?
Yes, Google Pay is supported via Drop-in integration. Ensure that your merchant account is enabled for Google Pay and you have added your domain information on the Airwallex web app > Payments > Settings. For more information, see Enable Google Pay. Once registered, you can pass googlePayRequestOptions JS in createElement to offer Google Pay. Note that countryCode is mandatory.
1const dropInElement = createElement('dropIn', {2 intent_id: intent.id,3 client_secret: intent.client_secret,4 googlePayRequestOptions: {5 countryCode: 'US',6 merchantInfo: {7 merchantName: 'Example Merchant',8 merchantId: '0123456789',9 },10 buttonType: 'buy', // Indicate the type of button you want displayed on your payments form. Like 'buy'11 }12});
Development resources
-
@airwallex/components-sdkNPM package -
Airwallex.js reference JS
-
Sample SDKs in various frontend and backend languages
-
Test cards and codesandbox to test your integration