Quickstart: Drop-in element
Complete a minimal end-to-end online payment in the sandbox environment using Airwallex.js and the Drop-in element. By the end of this tutorial, you will have a working checkout page with an embedded Drop-in element and a successful test payment in the sandbox.
You'll do the following:
- Authenticate to Airwallex and generate an access token.
- Create a PaymentIntent on your server.
- Build a checkout page that loads the Drop-in element with Airwallex.js.
- Verify the result in the Airwallex web app, via API, or with webhooks.
Airwallex AI tools can accelerate your integration. Connect your coding assistant to the Developer MCP for API and SDK guidance while you build.
Before you begin
- You must have a sandbox account for testing.
- Payments must be enabled on your Airwallex account with at least one payment method activated under Payments > Payment methods in the web app.
- You must have your Client ID and API key from Developer > API keys in the sandbox web app.
- You must be able to make HTTP requests from a backend server and serve a simple HTML page (or equivalent) that loads the Airwallex.js script from the CDN.
- Install Airwallex.js JS from the CDN (as in this tutorial) or via
@airwallex/components-sdk. If you currently use Airwallex Payment Elements , see the upgrade guide.
Step 1: Get an access token on your server
Payment APIs require an access token generated from your Client ID and API key.
Request
1curl -X POST https://api-demo.airwallex.com/api/v1/authentication/login \2 -H 'Content-Type: application/json' \3 -H 'x-api-key: {{YOUR_SANDBOX_API_KEY}}' \4 -H 'x-client-id: {{YOUR_SANDBOX_CLIENT_ID}}'
Response
1{2 "token": "your_access_token",3 "expires_at": "2025-12-31T23:59:59Z"4}
Save the token in your backend and reuse it until it expires.
Keep your Client ID, API key, and access tokens on your server only. Do not expose them in frontend code or mobile apps.
Step 2: Create a PaymentIntent on your server
A PaymentIntent represents your intent to collect a specific amount from a shopper. The Drop-in Element uses it to render payment methods and complete the payment.
End-to-end flow (sequence diagram)
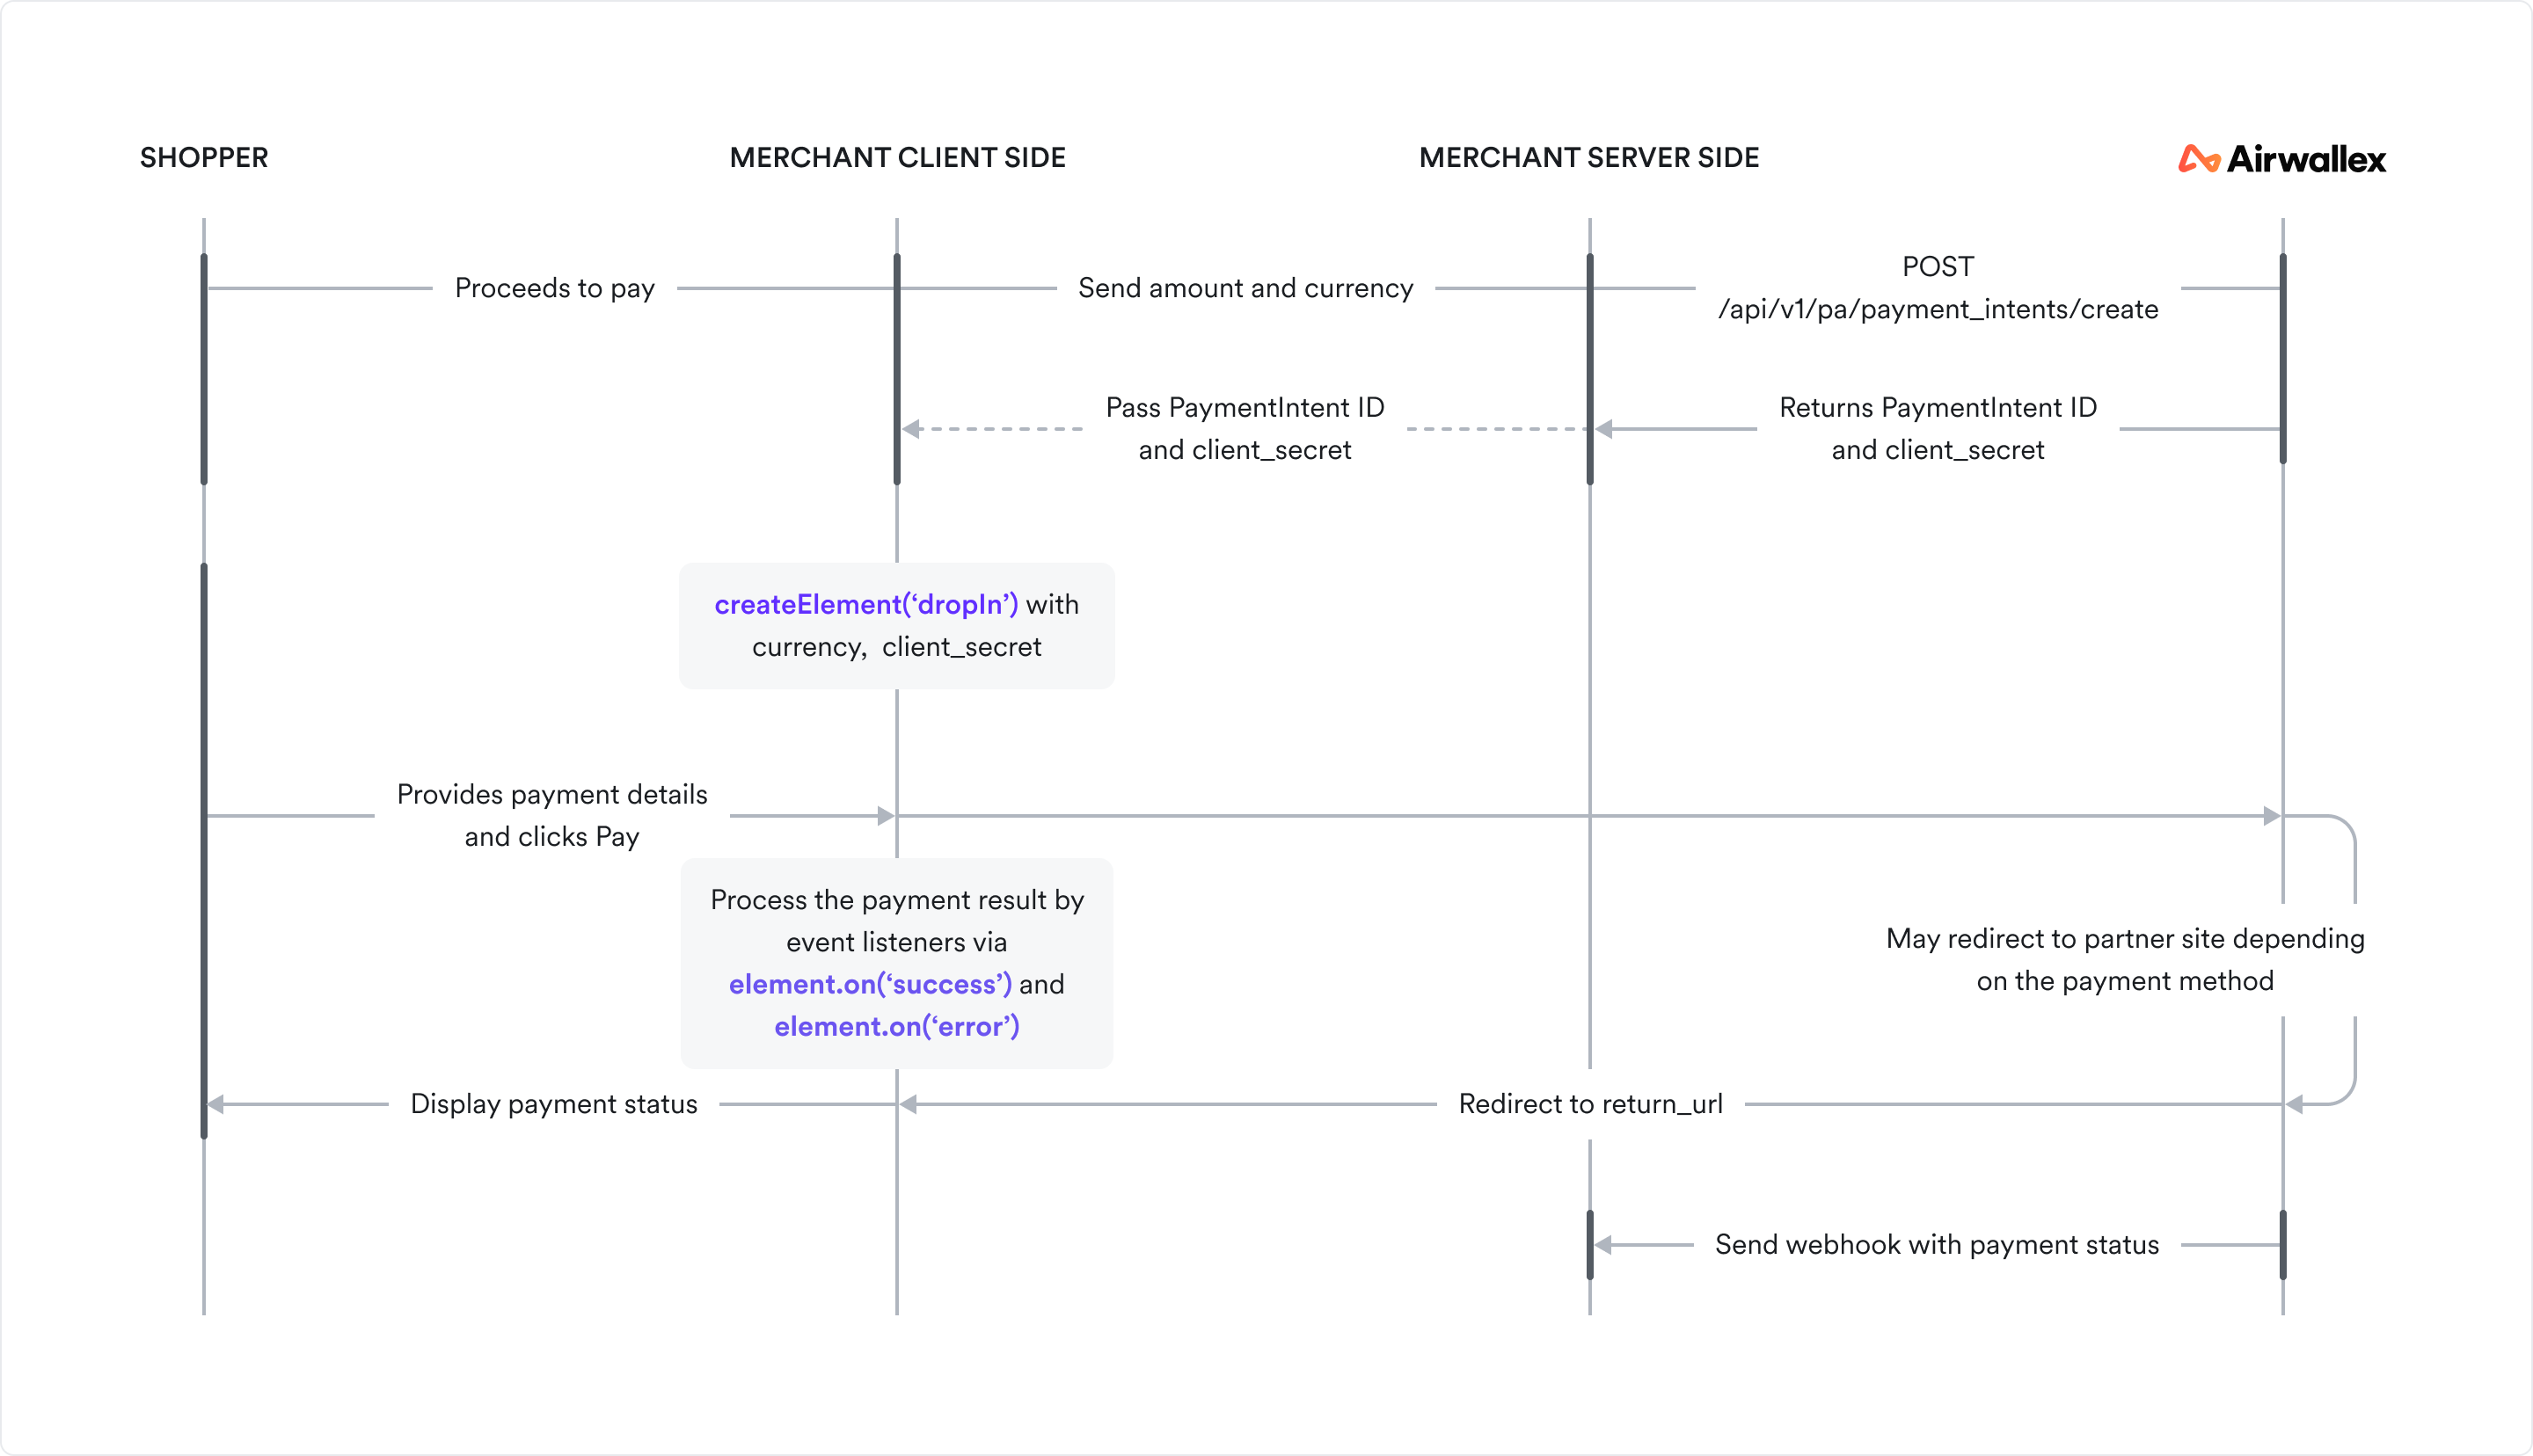
When the shopper begins checkout, call Create a PaymentIntent API on your server with request_id, amount, currency, and merchant_order_id. Always decide how much to charge on the server so shoppers cannot alter the amount.
Provide return_url if you offer redirect-based payment methods (for example Alipay, Dana, KakaoPay). The shopper is returned to that URL after the partner flow completes. Use a URL that includes a unique, non-sequential order identifier in the path or as a query parameter. You can map that identifier to the PaymentIntent id when handling the return.
Learn more about the PaymentIntents API.
Request
1curl -X POST https://api-demo.airwallex.com/api/v1/pa/payment_intents/create \2 -H 'Authorization: Bearer {{ACCESS_TOKEN}}' \3 -H 'Content-Type: application/json' \4 -d '{5 "request_id": "b01737e5-c5ab-4765-8834-cbd92dfeaf81",6 "amount": 10.99,7 "currency": "USD",8 "merchant_order_id": "D202503210001",9 "return_url": "https://www.example.com/order/D202503210001/result"10 }'
Airwallex amounts are in major currency units. For example, 10.99 means $10.99 USD, not 1,099 cents. This differs from some payment providers that use minor units (cents).
Response
The API returns a PaymentIntent object. See Create a PaymentIntent API for the full response schema.
1{2 "id": "int_your_payment_intent_id",3 "request_id": "b01737e5-c5ab-4765-8834-cbd92dfeaf81",4 "amount": 10.99,5 "currency": "USD",6 "merchant_order_id": "D202503210001",7 "status": "REQUIRES_PAYMENT_METHOD",8 "created_at": "2024-01-30T03:31:29+0000",9 "updated_at": "2024-01-30T03:31:29+0000",10 "client_secret": "your_client_secret"11}
For the checkout page in Step 3, you will need:
id: The PaymentIntent ID (intent_idon the client).client_secret: Used on the client to complete the payment securely.currency: The same currency you passed when creating the PaymentIntent.
Step 3: Build a basic checkout page with Drop-in element
Build a simple HTML page that loads Airwallex.js from the CDN, initializes the SDK, creates the Drop-in element JS, mounts it into a container, and listens for ready, success, and error events. Attach event listeners only after calling mount() JS.
Add the SDK, container, and script
1<!DOCTYPE html>2<html lang="en">3<head>4 <meta charset="utf-8" />5 <title>Quickstart — Drop-in Element</title>6 <script src="https://static.airwallex.com/components/sdk/v1/index.js"></script>7</head>8<body>9 <h1>Drop-in Element integration</h1>10 <p>Complete payment using the embedded Drop-in Element below.</p>11 <div id="dropIn"></div>12 <script async>13 const intent_id = 'replace-with-your-intent-id';14 const client_secret = 'replace-with-your-client-secret';15 const currency = 'replace-with-your-currency';1617 (async () => {18 await window.AirwallexComponentsSDK.init({19 env: 'demo',20 enabledElements: ['payments'],21 });2223 const element = await window.AirwallexComponentsSDK.createElement('dropIn', {24 intent_id,25 client_secret,26 currency,27 });2829 element.mount('dropIn');3031 element.on('ready', () => {32 // Element is mounted and ready for shopper interaction33 });3435 element.on('success', () => {36 // Handle successful payment (still verify on the server)37 });3839 element.on('error', () => {40 // Show a message so the shopper can retry41 });42 })();43 </script>44</body>45</html>
Replace replace-with-your-intent-id, replace-with-your-client-secret, and replace-with-your-currency with the values from the PaymentIntent you created in Step 2.
When the page loads:
- The Drop-in element mounts inside
#dropInand loads available payment methods. - The shopper selects a method, enters details, and completes any 3D Secure authentication when required.
- Your
successorerrorhandler runs when Airwallex reports the outcome on the client.
You can pass additional options in createElement(), for example styling or payment method filters. The client_secret and currency fields are required. For all options, see DropInElementOptions JS.
Using npm instead of the CDN
If you bundle your frontend with npm, use the same flow with module imports:
1import { init, createElement } from '@airwallex/components-sdk';23await init({4 env: 'demo',5 enabledElements: ['payments'],6});78const element = createElement('dropIn', {9 intent_id: 'replace-with-your-intent-id',10 client_secret: 'replace-with-your-client-secret',11 currency: 'replace-with-your-currency',12});1314element.mount('dropIn');15element.on('ready', () => {});16element.on('success', () => {});17element.on('error', () => {});
Step 4: Test with sandbox cards and verify the payment
Use test cards in the sandbox
Use the test card numbers to test success, failure, and 3DS flows. Create a new PaymentIntent for each test case and use the new id and client_secret on your checkout page.
Run at least:
- One successful card payment.
- One failed payment (invalid card or insufficient funds).
- One 3DS scenario.
Verify the PaymentIntent status
Verify that the payment worked in one of these ways:
-
Airwallex web app
Go to Payments > Payments Activity in the web app and confirm that your payments appear.
-
Retrieve PaymentIntent via API
Shell1curl -G https://api-demo.airwallex.com/api/v1/pa/payment_intents/int_your_payment_intent_id \2 -H 'Authorization: Bearer {{ACCESS_TOKEN}}'Check for
status: "SUCCEEDED"on a successful test payment. -
Webhooks (recommended for production)
Configure a webhook endpoint for
payment_intent.succeededand related events. Use it to trigger order fulfillment, emails, or internal workflows instead of relying only on client-side callbacks—the shopper may close the browser before yoursuccesshandler runs. For details, see Listen for webhook events.
Next steps
-
Prepare for production
Implement idempotency on create and confirm calls, add robust error handling for declines and network errors, and validate 3DS flows in your key markets.
-
Customize checkout
Adjust appearance and layout using
appearanceJS andlayoutJS. See Customize style and appearance. -
Try other integration options
Compare Hosted Payment Page, Embedded Elements, and more in Web checkout overview.
-
Explore full samples
Browse working integrations for popular web frameworks .
Complete Test your integration before going live. For troubleshooting tips, see Airwallex.js error codes.