Low-level API integration
Allows you to build your own custom UI on top of our low-level APIs.
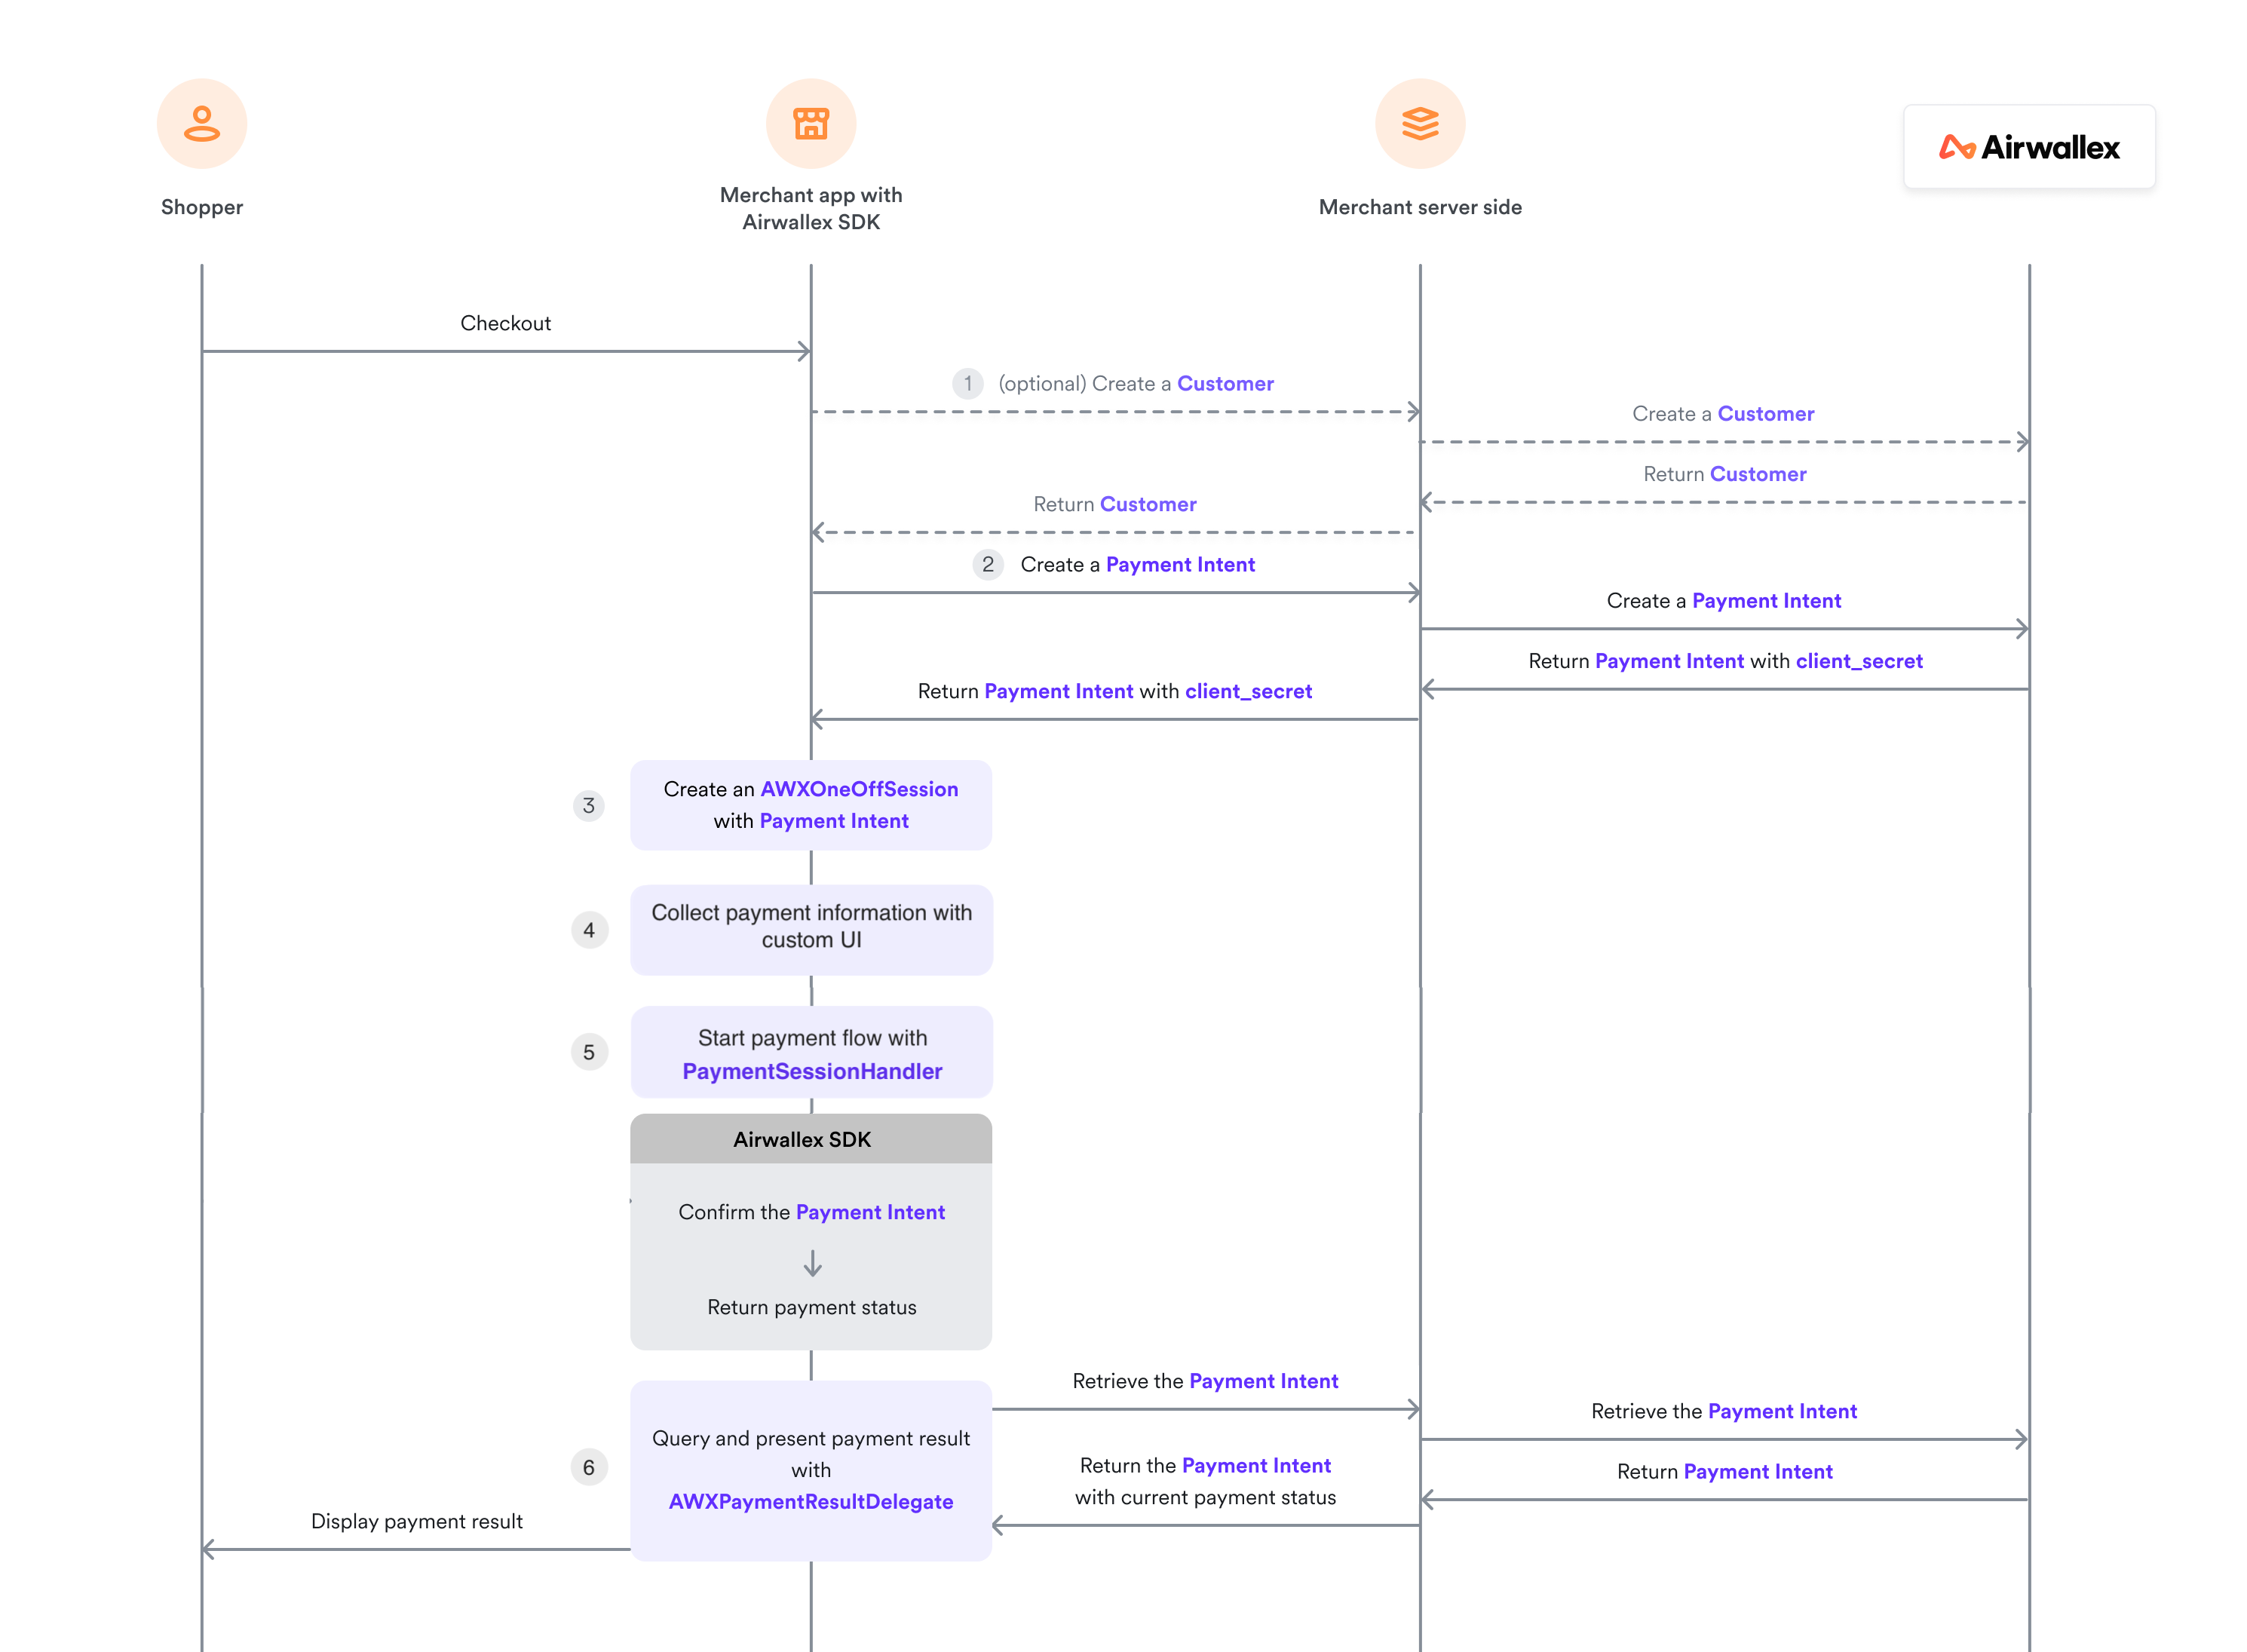
Step 1: (Optional) Create a Customer
Create a Customer object and pass it to your server if you want to save your customer's details and attach payment information to this object. Note that this step is compulsory when you process recurring payments for a new customer.
From your server, access Airwallex API to Create a Customer API.
Step 2: Create a PaymentIntent
Your client app will need a PaymentIntent to create a payment session for Airwallex SDK to present a payment flow.
From your server, access Airwallex API to Create a PaymentIntent API and pass the returned PaymentIntent to the client app.
Step 3: Configuration and create AirwallexSession
After setting up the SDK, configure it with the required parameters.
Configuration
Initialize the SDK in your Application class:
1Airwallex.initialize(2 this,3 AirwallexConfiguration.Builder()4 .enableLogging(true) // Enable log in SDK, best set to false in release version5 .saveLogToLocal(false) // Save logs locally6 .setEnvironment(environment)7 .setSupportComponentProviders(8 listOf(9 CardComponent.PROVIDER,10 WeChatComponent.PROVIDER,11 RedirectComponent.PROVIDER,12 GooglePayComponent.PROVIDER13 )14 )15 .build()16)
Create AirwallexSession
Create a PaymentSession with all the order related information:
1val session = AirwallexPaymentSession.Builder(2 paymentIntent = paymentIntent, // PaymentIntent created for this order3 countryCode = "Your country code"4)5 .setReturnUrl("App return url")6 .build()
For Google Pay, you need to add GooglePayOptions to the session. See Prepare payment session.
1val googlePayOptions = GooglePayOptions(2 billingAddressRequired = true,3 billingAddressParameters = BillingAddressParameters(4 format = BillingAddressParameters.Format.FULL5 ),6 merchantId = "Your Google Pay Merchant ID"7)89val session = AirwallexPaymentSession.Builder(10 paymentIntent = paymentIntent,11 countryCode = "Your country code",12 googlePayOptions = googlePayOptions13)14 .setReturnUrl("App return url")15 .build()
Step 4: Collect payment information using custom UI
For native UI integration, this step is handled by the Airwallex-provided UI. For low-level API integration, you must implement your own UI to collect all the information required for payment.
PCI-DSS compliance
For card payment, your app must be PCI-DSS compliant if using Confirm card payment with card and billing details flow. Provide a PCI-DSS AOC and renew it regularly.
For redirect payments, make sure you collect all the required information (e.g. shopper phone number, email) specified in the response from Get available payment method types API.
Step 5: Create Airwallex object and confirm payments
Create Airwallex object
1val airwallex = Airwallex(activity)
Confirm payment with card and billing details
1// Confirm payment intent with card and billing details2airwallex.confirmPaymentIntent(3 session = session,4 card = PaymentMethod.Card.Builder()5 .setNumber("4012000300000021") // Card number collected by your custom UI6 .setName("John Citizen")7 .setExpiryMonth("12")8 .setExpiryYear("2029")9 .setCvc("737")10 .build(),11 billing = null, // Optional billing information12 saveCard = false, // Set to true to save the card information while making the payment13 listener = object : Airwallex.PaymentResultListener {14 override fun onCompleted(status: AirwallexPaymentStatus) {15 // Handle different payment statuses and perform UI actions accordingly16 when (status) {17 is AirwallexPaymentStatus.Success -> {18 // Payment successful19 }20 is AirwallexPaymentStatus.InProgress -> {21 // Payment in progress22 }23 is AirwallexPaymentStatus.Failure -> {24 // Payment failed25 }26 is AirwallexPaymentStatus.Cancel -> {27 // Payment cancelled28 }29 }30 }31 }32)
Confirm payment with saved card (consent)
- Pay with a consent ID: Confirm payment with a valid payment consent ID when the card is saved as network token
1airwallex.confirmPaymentIntent(2 session = session,3 paymentConsentId = "cst_xxxxxxxxxx",4 listener = object : Airwallex.PaymentResultListener {5 override fun onCompleted(status: AirwallexPaymentStatus) {6 // Handle different payment statuses and perform UI actions accordingly7 }8 }9)
- Pay with a PaymentConsent object: Confirm payment with a payment consent object
PaymentConsent
1airwallex.confirmPaymentIntent(2 session = session as AirwallexPaymentSession,3 paymentConsent = paymentConsent,4 listener = object : Airwallex.PaymentResultListener {5 override fun onCompleted(status: AirwallexPaymentStatus) {6 // Handle different payment statuses and perform UI actions accordingly7 }8 }9)
Launch payment via Google Pay

Before invoking the payment API, make sure you have set up Google Pay options in your session (see Step 3) and followed the Google Pay setup steps.
1// Make sure you pass GooglePayOptions to the session when creating it2airwallex.startGooglePay(3 session = session,4 listener = object : Airwallex.PaymentResultListener {5 override fun onCompleted(status: AirwallexPaymentStatus) {6 // Handle different payment statuses and perform UI actions accordingly7 }8 }9)
Pay by redirection
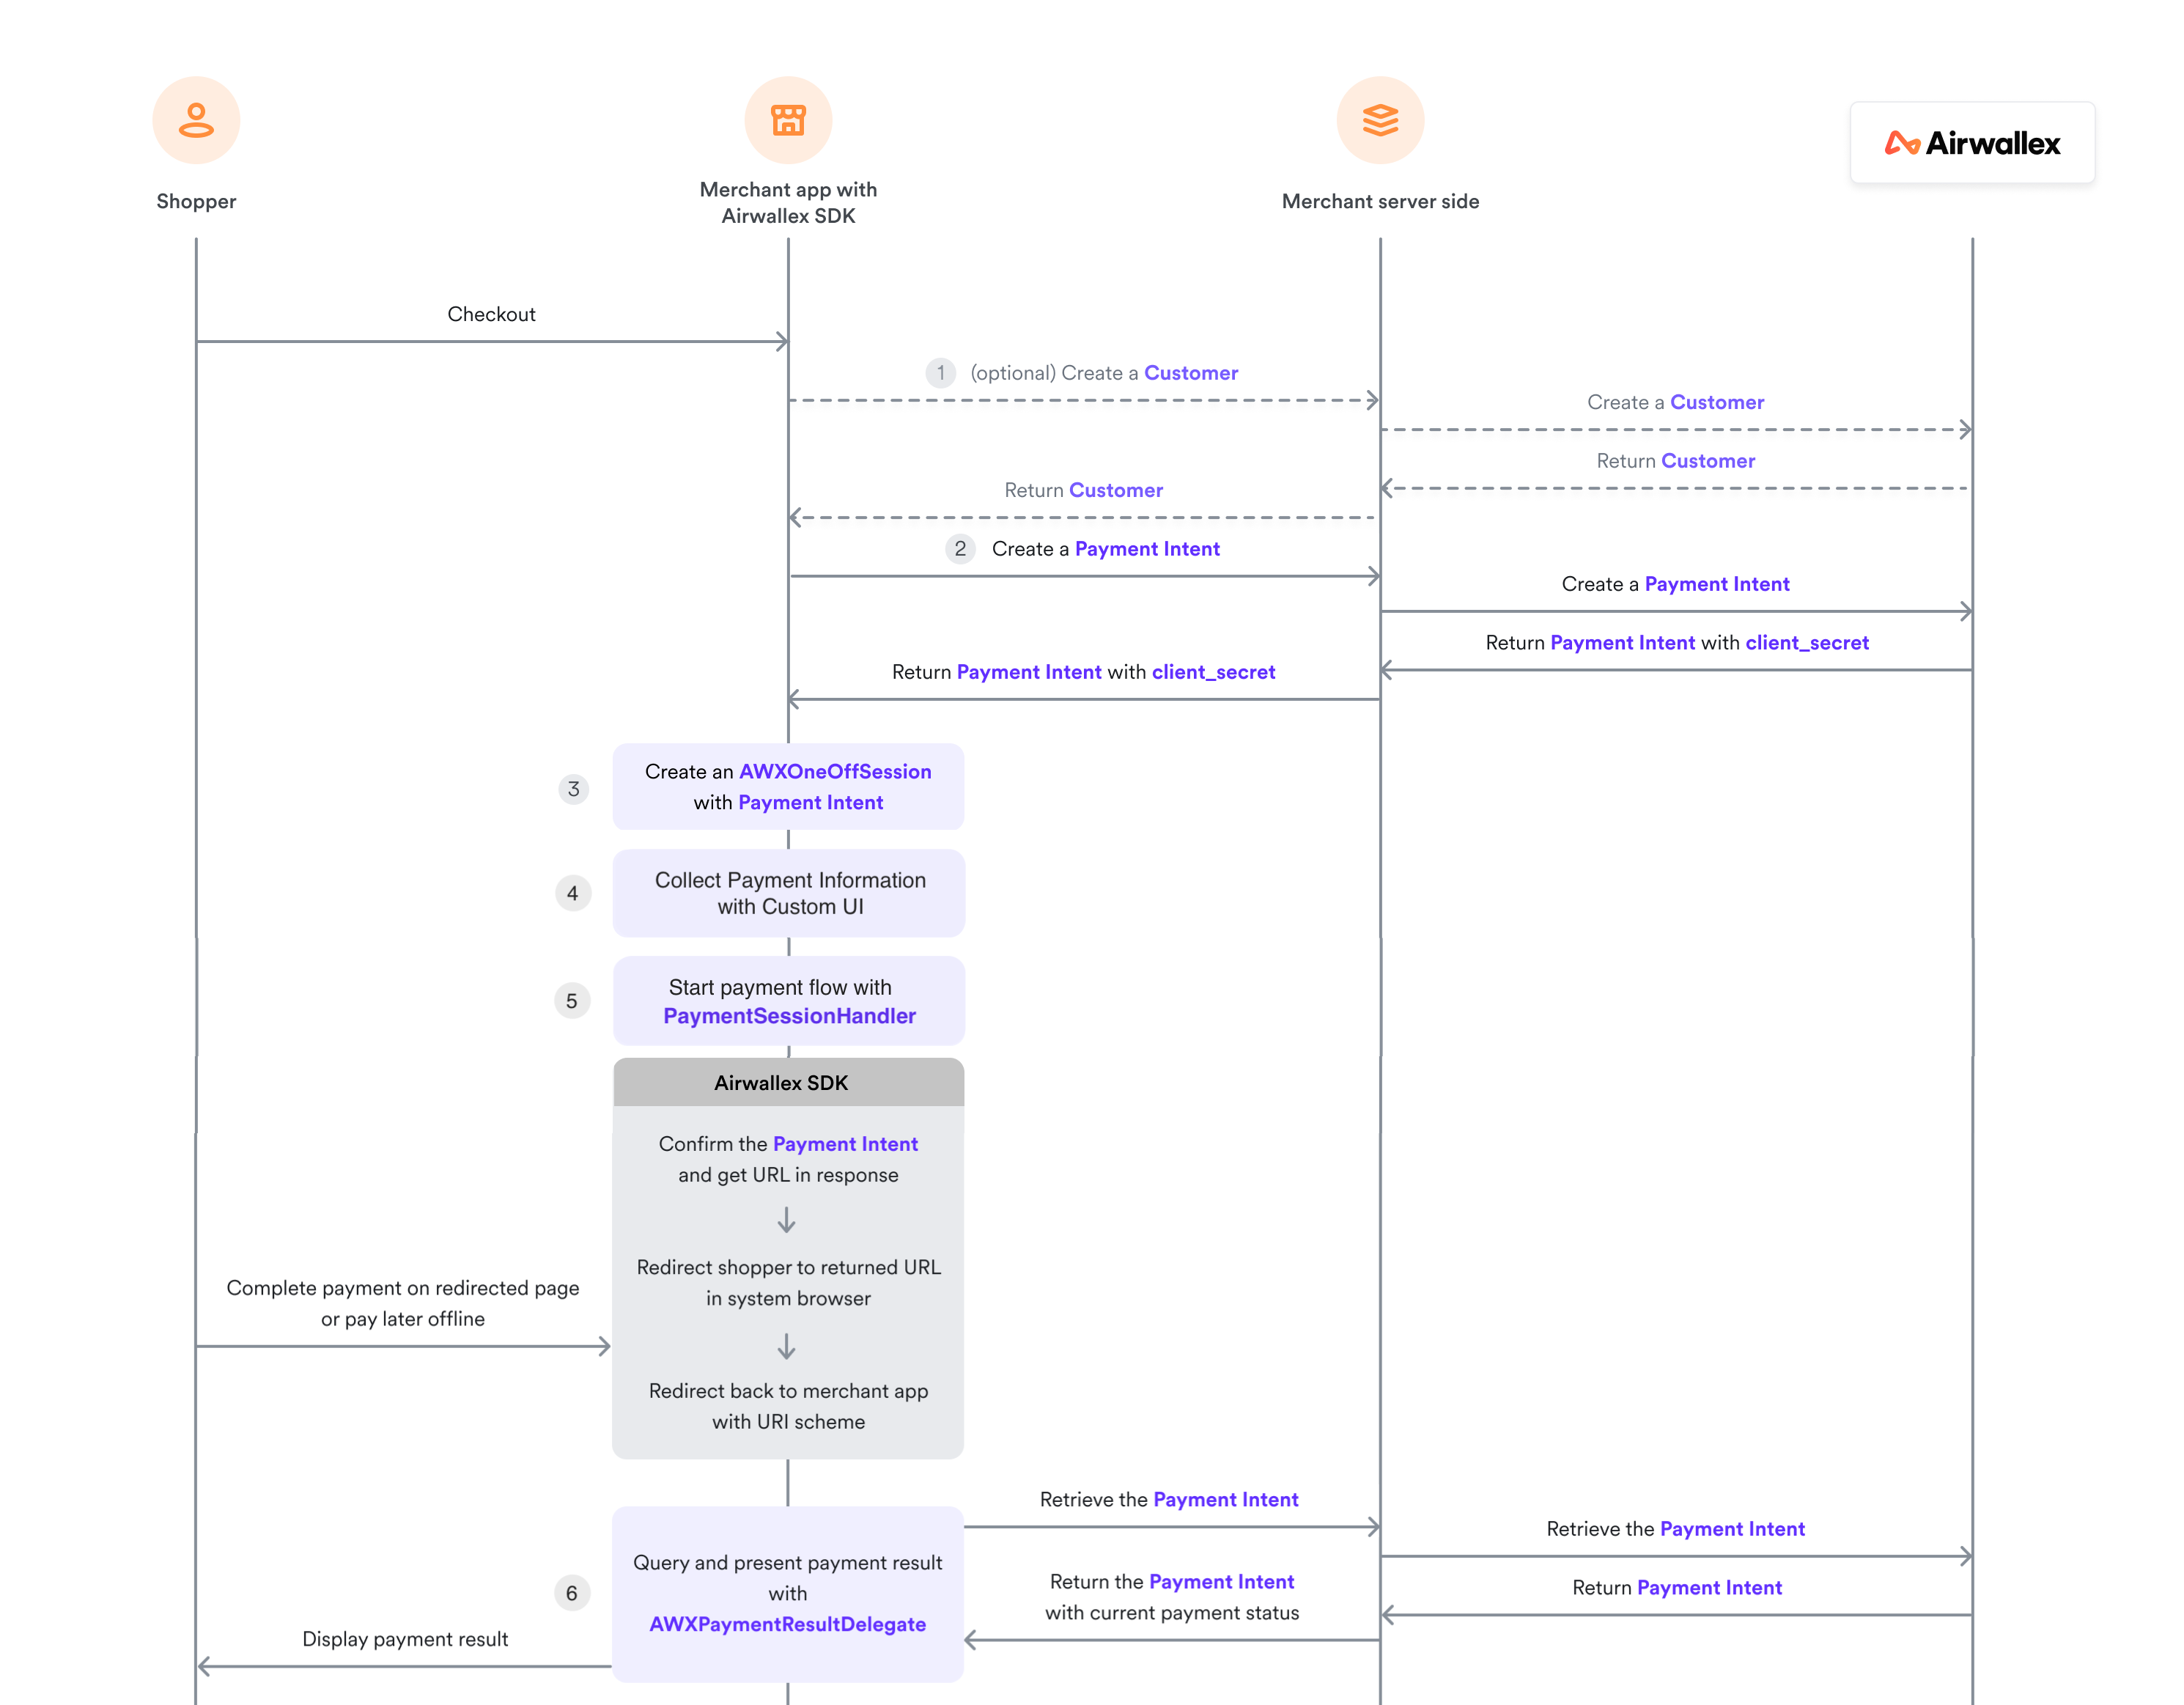
Use the redirect payment method for payment methods like Alipay, AlipayHK, DANA, GCash, Kakao Pay, Touch 'n Go, etc.
1airwallex.startRedirectPay(2 session = session,3 paymentType = "alipayhk", // Payment method type (e.g., "alipaycn", "alipayhk", "gcash", "dana")4 listener = object : Airwallex.PaymentResultListener {5 override fun onCompleted(status: AirwallexPaymentStatus) {6 // Handle different payment statuses and perform UI actions accordingly7 }8 }9)
Step 6: Handle payment result
After the payment is confirmed, the onCompleted callback will be invoked by the SDK automatically. You can check the status to see whether the payment process has completed or not.
The AirwallexPaymentStatus can be one of the following:
AirwallexPaymentStatus.Success- Payment completed successfullyAirwallexPaymentStatus.InProgress- Payment is still in progressAirwallexPaymentStatus.Failure- Payment failedAirwallexPaymentStatus.Cancel- Payment was cancelled
1listener = object : Airwallex.PaymentResultListener {2 override fun onCompleted(status: AirwallexPaymentStatus) {3 when (status) {4 is AirwallexPaymentStatus.Success -> {5 // Payment completed successfully6 val paymentIntentId = status.paymentIntentId7 // Show success message to user8 }9 is AirwallexPaymentStatus.InProgress -> {10 // Payment is still in progress11 // This might require further action from the user12 }13 is AirwallexPaymentStatus.Failure -> {14 // Payment failed15 val exception = status.exception16 // Show error message to user17 }18 is AirwallexPaymentStatus.Cancel -> {19 // Payment was cancelled by user20 // Return to previous screen or show message21 }22 }23 }24}