Guest user checkout
This page describes how to embed a Drop-in Element on your payment page to accept payments.
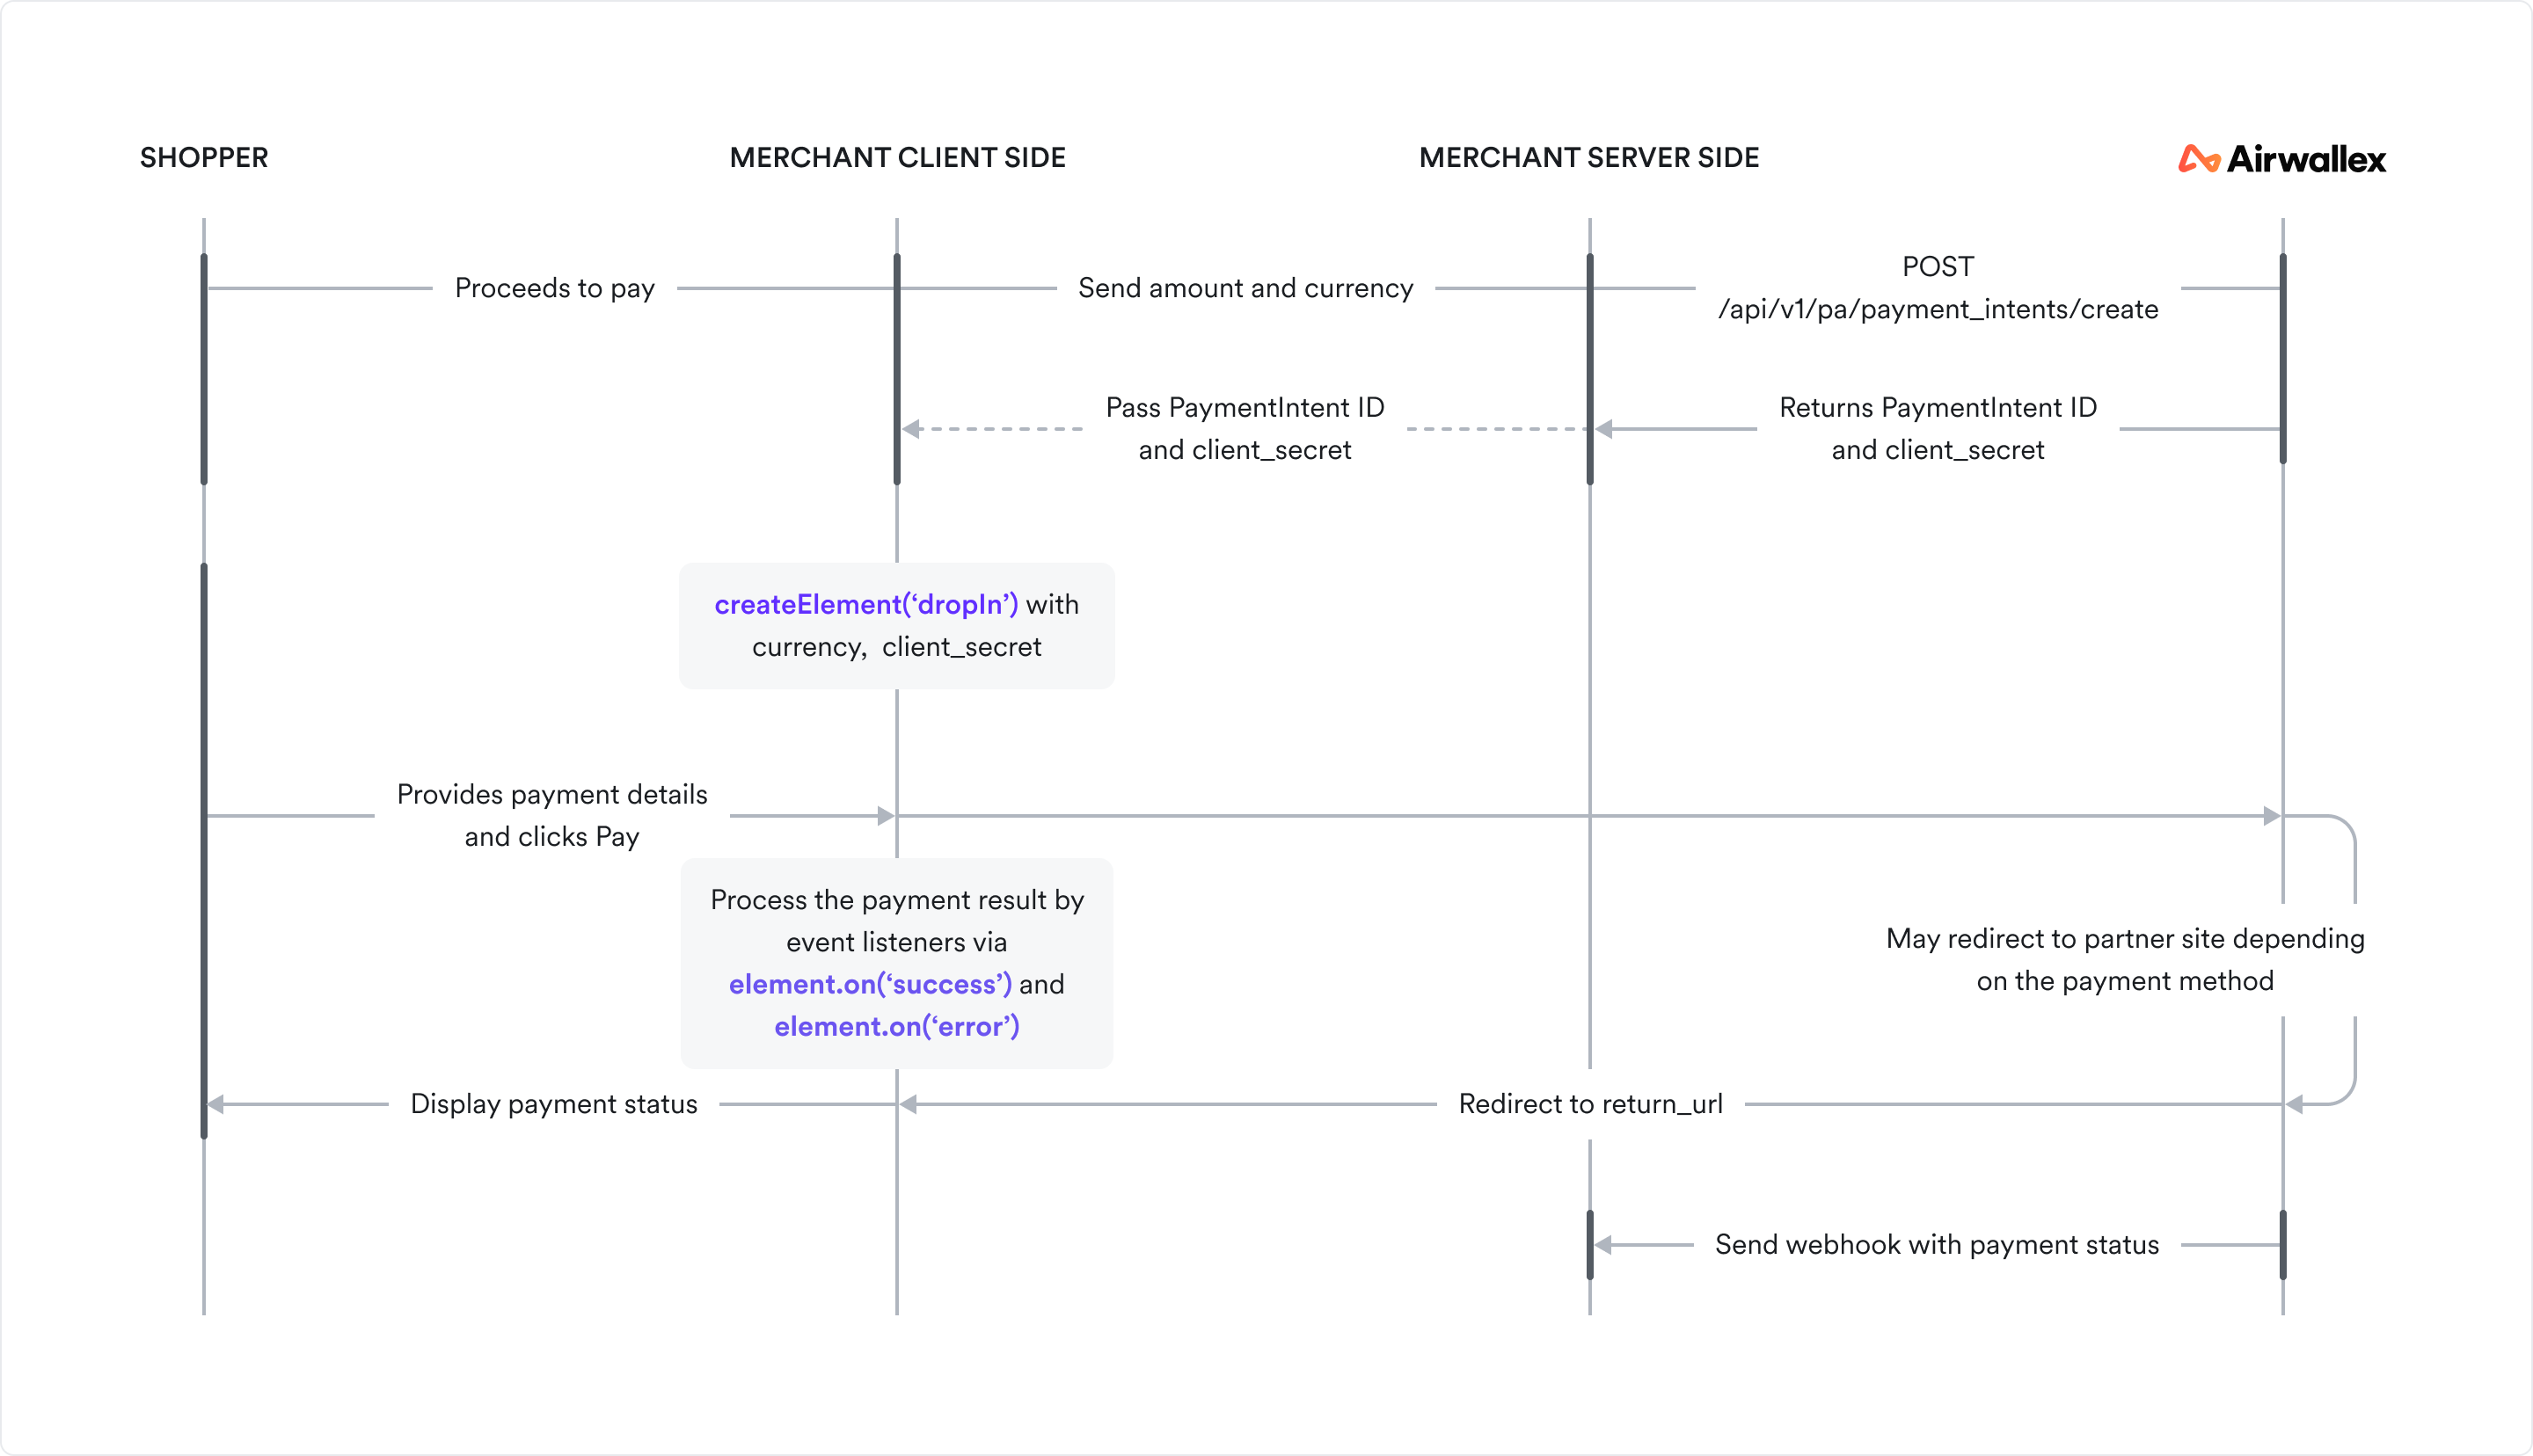
How it works
The diagram below depicts the information flow in a Drop-in Element integration.
Before you begin
Before you implement the integration, consider the following:
-
Ensure your Airwallex account is activated for online payments.
-
Obtain your access token API by authenticating to Airwallex using your unique Client ID and API key. You will need the access token to make API calls.
-
Install Airwallex.js JS. If your integration currently uses Airwallex Payment Elements , refer to our upgrade guide for information on migrating to Airwallex.js.
Step 1: Set up the server to create a PaymentIntent
When the shopper begins the checkout process, you will need to create a PaymentIntent object to indicate your intent to collect payment from the shopper.
When the checkout page loads, on your server, call Create a PaymentIntent API with an amount and currency. Always decide how much to charge on the server side, a trusted environment, as opposed to the client. This prevents malicious shoppers from being able to alter the payment amount.
Provide return_url in Create a PaymentIntent API if you want to offer alternative payment methods (Alipay, Dana, KakaoPay, etc) that redirect shoppers to a partner site. The shopper will be returned to the return_url after the payment is complete, whether successful or otherwise. Use a return_url that includes a unique, non-sequential order identifier in either the path or as a query parameter.
The PaymentIntent’s id and client_secret are returned in the response — these parameters let you confirm the payment and update card details on the client, without allowing manipulation of sensitive information, like payment amount. You can store the PaymentIntent id in your database by mapping it to your order identifier. When Airwallex navigates the shopper to your return URL, you can read the order identifier in the URL from your handler and look up the stored mapping to extract the PaymentIntent ID and use it to retrieve the payment result.
1curl -X POST https://api-demo.airwallex.com/api/v1/pa/payment_intents/create \2 -H 'Content-Type: application/json' \3 -H 'Authorization: Bearer {{ACCESS_TOKEN}}' \4 -d '{5 "request_id": "00e8df19-7087-4209-b50b-067d6a39ee72",6 "amount": 100,7 "currency": "CNY",8 "merchant_order_id": "Merchant_Order_a7f9baf8-884a-4def-ba85-d1f9be83470a",9 "return_url": "http://www.merchant.com/order/a7f9baf8-884a-4def-ba85-d1f9be83470a/result"10 }'
Step 2: Initialize Airwallex.js on your checkout page
First, you will need to install Airwallex.js JS. Once installed, initialize JS the package with the payments element enabled JS.
1import { init } from '@airwallex/components-sdk';23const { payments } = await init({4 env: 'demo',5 enabledElements: ['payments'],6});
Step 3: Add the Drop-in Element to your checkout page
To embed the Drop-in Element JS into your checkout page, you will need to create an empty container, create the Element and then mount the Element to the container.
Define the payment form
First, create an empty container div with a unique id in your payment form. Ensure that the payment form only contains one Element with this unique id. Airwallex inserts an iframe into this div on mounting the Element.
1<div id="dropIn"></div>
Create the Drop-in Element
When the payment form has loaded, create the Drop-in Element JS. Ensure that the payment form only contains one container element with dropIn as its id attribute.
1import { createElement } from '@airwallex/components-sdk';23const element = createElement('dropIn', {4 intent_id: 'replace-with-your-intent-id',5 client_secret: 'replace-with-your-intent-client-secret',6 currency: 'replace-with-your-payment-currency',7});
Mount the Drop-in Element
Call mount() JS with the id of the container element to mount the Drop-in Element to the web page's DOM. The Element should only be mounted once for a single payment flow.
1element.mount('dropIn'); // Injects iframe into the Drop-in Element container
When the Drop-in Element is successfully mounted, a ready event is triggered. Listen for this event to know when the Element is ready for shopper interaction. Attach this event listener only after calling the Element's mount() method.
1// Attach `ready` event listener after mounting the payment element2element.on('ready', (event) => {3 // Element is mounted on the web page's DOM and can be made visible to the shopper4});
Drop-in Props
You can also pass options in createElement() to overwrite styles and other functions. The client_secret and currency fields are required. For details, see DropInElementOptions JS.
Step 4: Handle the response
Attach success and error event listeners to handle error and success events received from Airwallex. Attach these event listeners only after calling the Element's mount() method first.
1// Attach `success` and `error` event listeners after mounting the payment element2element.on('success', (event) => {3 // Handle event on success4});56element.on('error', (event) => {7 // Handle event on error8});
If no error occurred, display a message that the payment was successful. If payment fails with an error, display the appropriate message to your shopper so they can take action and try again.
Retrieve the payment result
For any actions subsequent to the payment such as shipping goods or sending email receipts, you can retrieve the payment result using the following options:
-
Set up webhooks to receive notifications on whether the payment has succeeded. Airwallex sends
payment_intent.succeededevent when a payment succeeds. Listen to these events rather than waiting on a callback from the client. On the client, the shopper could close the browser window or quit the app before the callback executes. For information on how to set up webhooks and listen to events, see Getting started with webhooks -
On your server, call Retrieve a PaymentIntent API to check the PaymentIntent status.
-
Check Payment Activity screen on your Airwallex web app.
Test your integration
Use test card numbers and the test and go-live checklist to test your integration for various success and error scenarios in the sandbox environment and then go live in the production environment.
Example integrations
Explore a full, working code sample of an integration built using various web frameworks .
Troubleshooting
For troubleshooting tips, see Airwallex.js error codes.