

Embedded component
How to integrate the Airwallex embedded onboarding component to collect identity information from connected accounts.
To integrate the embedded component for onboarding verification, complete the steps in this document. Onboarding verification, previously referred to as Know Your Customer (KYC), is the process by which Airwallex verifies the identity of a connected account holder. The embedded component is a pre-built UI element that Airwallex hosts and embeds in your platform via an iframe. It dynamically adjusts identity information collection based on the account holder's country and account type, and supports advanced theming to match your brand. This method supports business accounts only.
To preview the onboarding experience, see the Airwallex demo site.
How it works
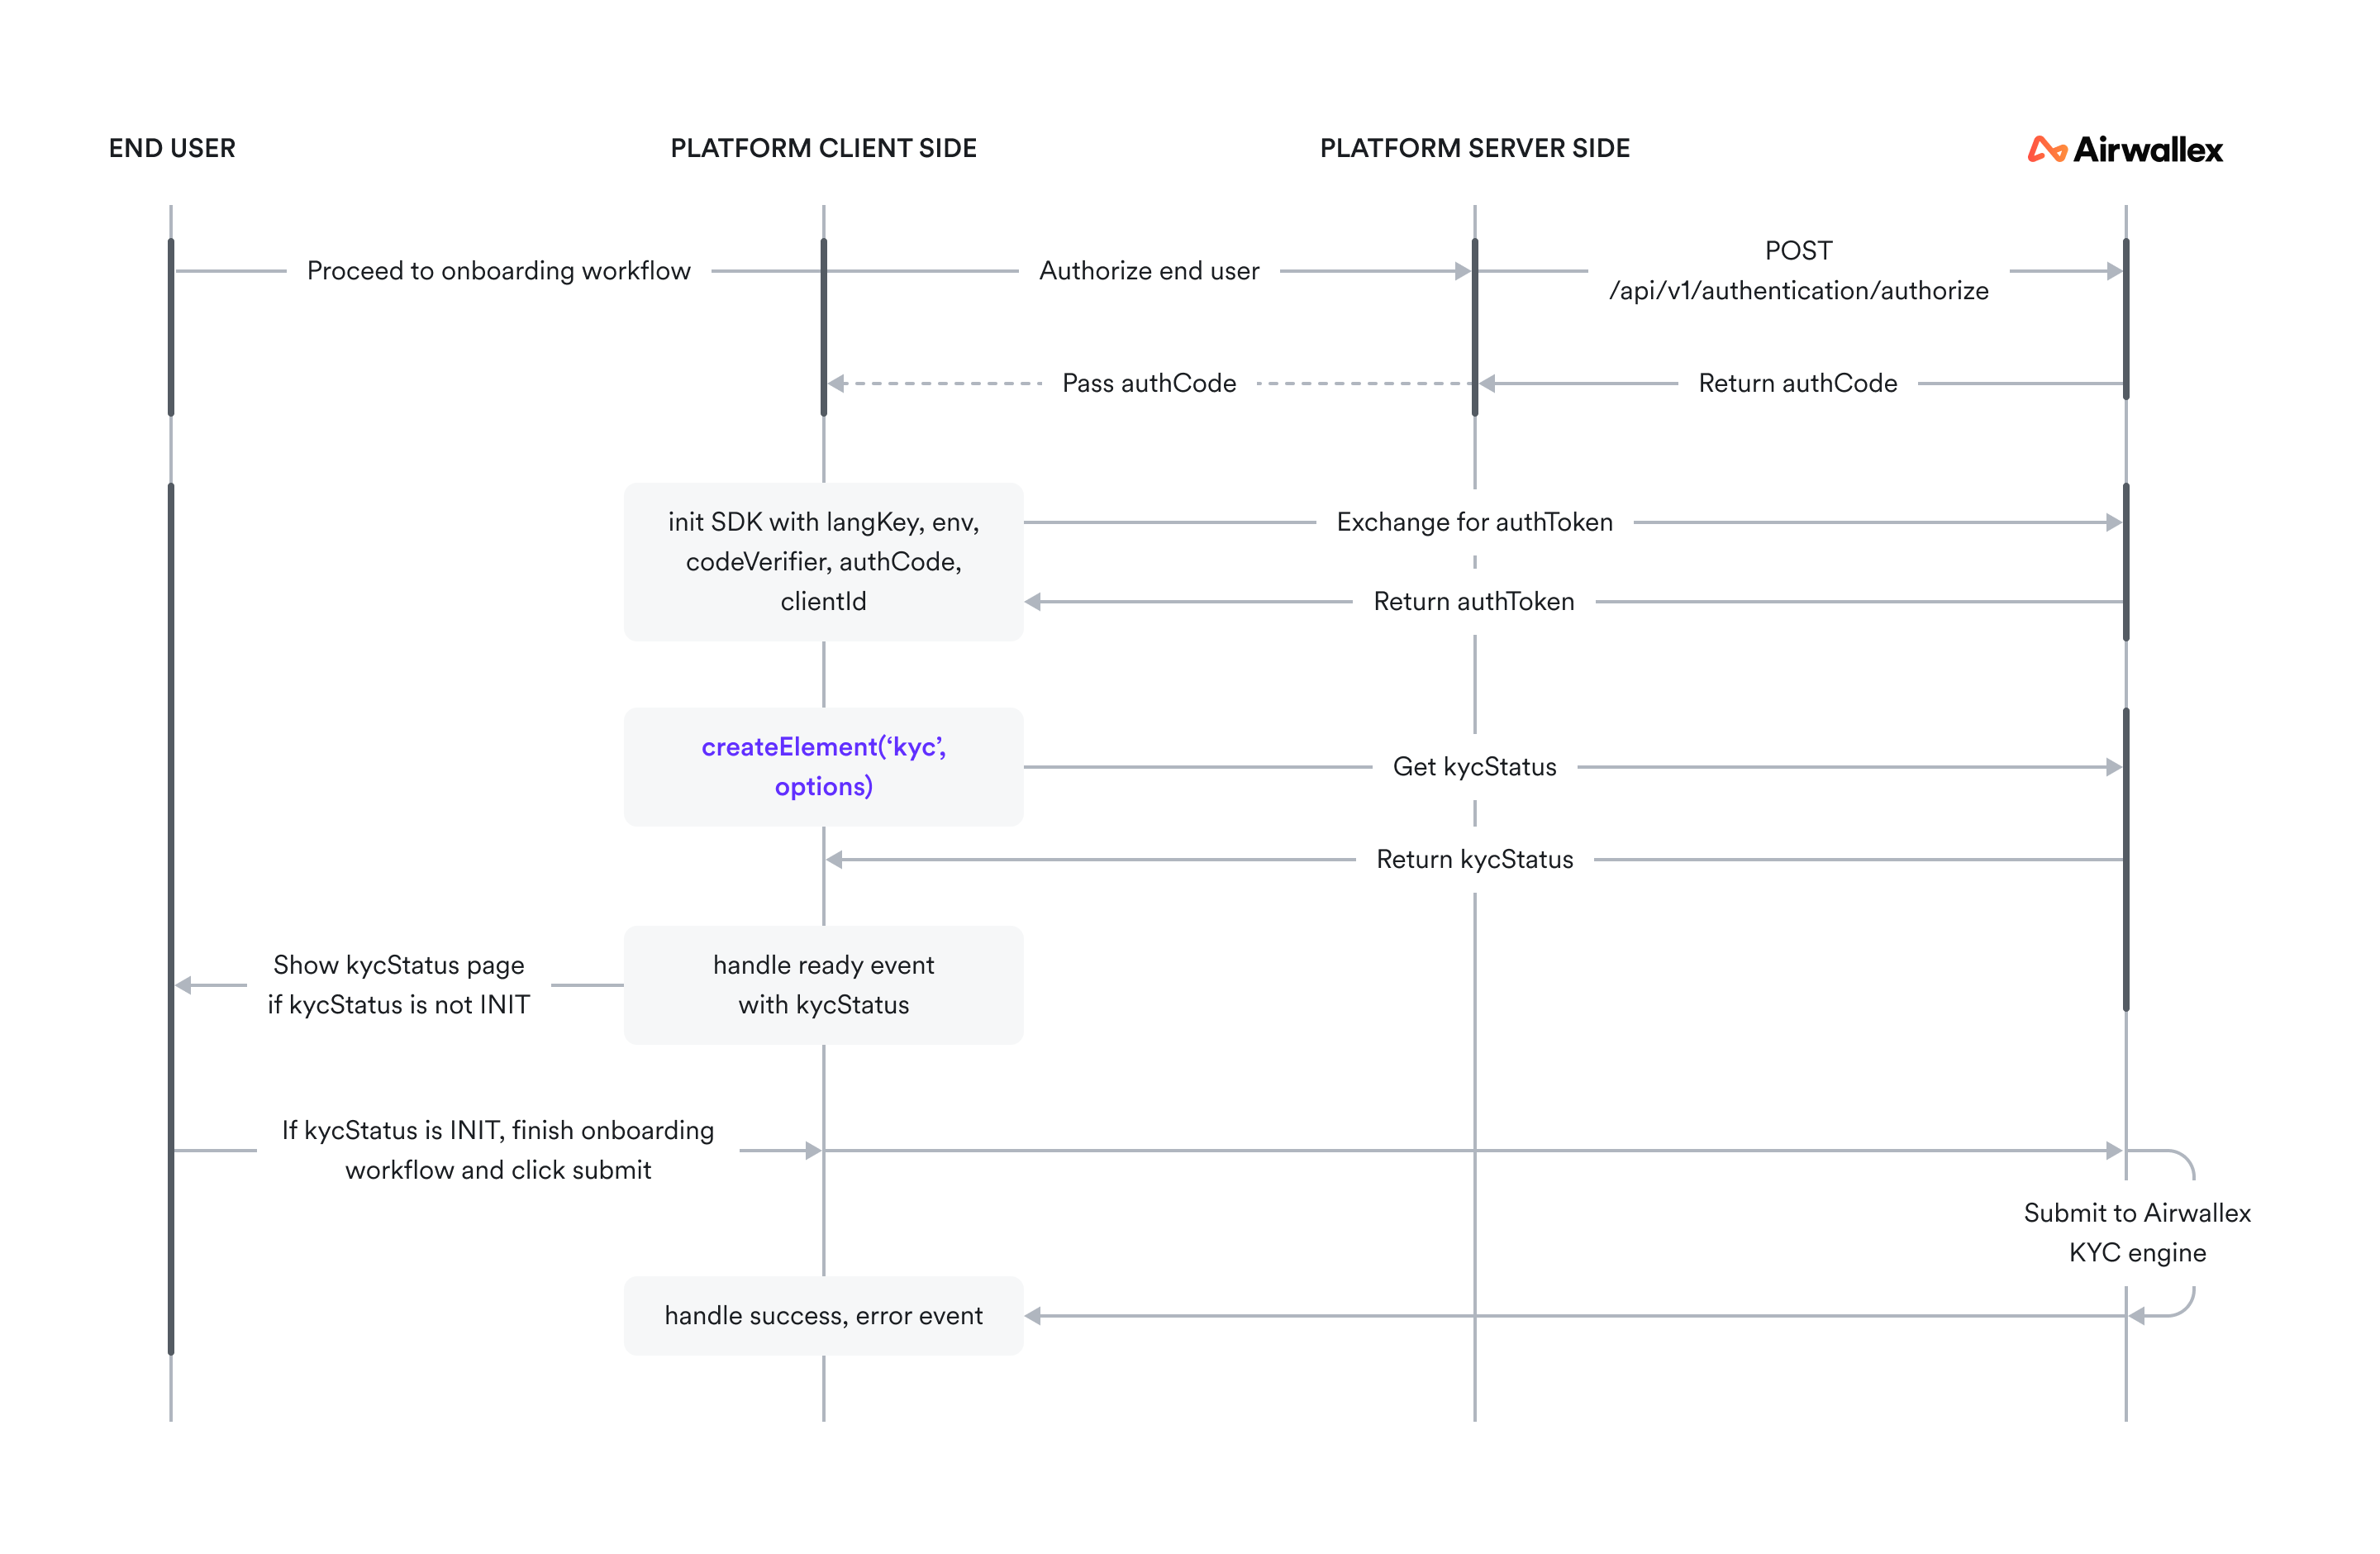
The diagram below depicts the information flow in an embedded component integration.
Before you begin
Ensure you have the following before you start:
- An access tokenAPI for your Airwallex account.
- Embedded Components enabled on your platform account, including any brand theming (color palette and logo). Contact your Airwallex Account Manager to request enablement and theming. Your Account Manager confirms when you can initialize the component.
- Airwallex.jsJS installed and initialized in your project.
- Familiarity with the Airwallex.js referenceJS, including Element methods, parameters, and properties.
Create a connected account
Call Create a connected accountAPI and provide the required fields in the request. The connected account must agree to the terms of data usage before the API request is made.
Example request
1curl -X POST https://api.sandbox.airwallex.com/api/v1/accounts/create \2 -H 'Content-Type: application/json' \3 -H 'Authorization: Bearer {{ACCESS_TOKEN}}' \4 -d '{5 "primary_contact": {6 "email": "[email protected]"7 },8 "account_details": {9 "business_details": {10 "business_name": "Example Company",11 "registration_address": {12 "country_code": "AU"13 }14 }15 },16 "customer_agreements": {17 "agreed_to_terms_and_conditions": true,18 "agreed_to_data_usage": true19 }20 }'
Save the account_id returned in the response and implement error handling.
Optionally, call Update a connected accountAPI to pre-fill account information.
Pre-fill onboarding data
You can pre-fill the embedded onboarding component with data already saved to the connected account through Create a connected accountAPI or Update a connected accountAPI.
Pre-fill is API-driven. After data is persisted, the component reads the saved account details and automatically fills matching form fields when mounted.
Pre-fill business_person_details
For business onboarding flows, you can pre-fill account_details.business_person_details fields, including:
- Name fields (
first_name,middle_name,last_name, and English variants). roles,nationality,date_of_birth,email, andphone_number.residential_addressfields.- Identification fields under
identifications.primary.
Minimum person payload for visibility
To show a person in the person list, include at least one valid role in roles.
1{2 "account_details": {3 "business_person_details": [4 {5 "first_name": "Jane",6 "last_name": "Doe",7 "roles": ["BENEFICIAL_OWNER"]8 }9 ]10 }11}
Without roles, a person record can still be stored through the API but might not be visible in the embedded component.
Use Business onboarding verification requirements by country to confirm role coverage and conditional requirements needed for successful submission.
Initialize the SDK
Import the components-sdk and initialize the environment. For details, see InitializationJS.
Set up the server for authentication
When the connected account holder begins the onboarding process, get an authorization code to authorize them into the embedded onboarding workflow. Always retrieve the authorization code on the server side to prevent malicious users from altering the scope.
When the onboarding page loads, call Authorize a connected accountAPI on your server. Provide your Airwallex connected account ID in the x-on-behalf-of header and the following required fields in the request:
-
scope: Indicates the resources your application is allowed to access. For embedded onboarding, provideonboarding:writeas the scope. -
code_challenge: Generate a challenge token together with thecode_verifierusing the S256 generation method as described in RFC 7636 Section 4.code_challenge=BASE64URL-ENCODE(SHA256(ASCII(code_verifier))). Use a third-party package to generatecode_verifierandcode_challenge, or use the following JavaScript code example.
1// Generate code_verifier2const dec2hex = (dec: number) => {3 return ('0' + dec.toString(16)).slice(-2);4};56const generateCodeVerifier = () => {7 // generate random length for code_verifier which should be between 43 and 1288 const length = Math.random() * (129-43) + 43;9 const array = new Uint32Array(length/2);10 window.crypto.getRandomValues(array);11 return Array.from(array, dec2hex).join('');12};1314const codeVerifier = generateCodeVerifier();
1// Install js-base64 package (a third-party package, not under the control of Airwallex).2import { Base64 } from 'js-base64';34// Generate code_challenge5const sha256 = (plain: string) => {6 const encoder = new TextEncoder();7 const data = encoder.encode(plain);8 return window.crypto.subtle.digest('SHA-256', data);9};1011const base64urlencode = (hashed: ArrayBuffer) => {12 const bytes = new Uint8Array(hashed);13 const base64encoded = Base64.fromUint8Array(bytes, true);14 return base64encoded;15};1617export const generateCodeChallengeFromVerifier = async (codeVerifier: string) => {18 const hashed = await sha256(codeVerifier);19 const base64encoded = base64urlencode(hashed);20 return base64encoded;21};2223const codeChallenge = await generateCodeChallengeFromVerifier(codeVerifier);
The authorization_code is returned in the response. Return it to the client side as authCode to initialize the embedded onboarding component.
Add the embedded component to your page
Create an empty container, create the onboarding component, and mount the element to the container.
Define the onboarding container
Create an empty container div with a unique id in your onboarding page. Airwallex inserts an iframe into this div when the element is mounted.
Create the embedded component
To create the onboarding component, call createElement(type, options) and specify the type as kyc. This method creates an instance of an individual component. Components are rendered as iframes.
You can also pass options in createElement() to overwrite styles and other functions. All properties are optional. For details, see createElement() referenceJS.
1// Type:2createElement: (type: string, options: Record<string, unknown>) => Element34// Example:5const element = createElement('kyc', {6 hideHeader: true,7 hideNav: true,8});
The type argument 'kyc' is the stable API identifier for this component.
Mount the element
Call element.mount() with the id of the div container to mount the element to the DOM. This builds an embedded onboarding workflow. Mount the element only once in a single onboarding flow.
1// Type:2element.mount (domElement: string | HTMLElement) => void34// There are two ways to mount the element:5// 1. Call with container DOM id6element.mount('container-dom-id');78// 2. Find the created DOM in existing HTML and call with container DOM element9const containerElement = document.getElementById("container-dom-id");10element.mount(containerElement);
For all other methods supported by this component, see Airwallex.js referenceJS.
Handle the ready event
Add the 'ready' eventJS listener to ensure the onboarding component is rendered. Show a loading state UI before the 'ready' event is received. You can also use the kycStatus result, which represents the account's onboarding status, to render different status pages accordingly.
If an account holder exits and returns to the onboarding flow, use kycStatus to handle re-entry. An INIT status means the account holder resumes from where they left off. A SUBMITTED, SUCCESS, or FAILURE status means they have already completed the flow — render the appropriate status page rather than showing the form again.
1element.on('ready', (event) => {2 if (event.kycStatus !== 'INIT') {3 // render different kycStatus pages4 switch (event.kycStatus) {5 case 'SUBMITTED': // account already submitted for onboarding6 // show SUBMITTED kycStatus page7 break;8 case 'SUCCESS': // account already onboarded successfully9 // show SUCCESS kycStatus page10 break;11 case 'FAILURE': // account rejected for onboarding12 // show FAILURE kycStatus page13 break;14 }15 } else {16 // remove loading state17 setLoading(false);18 }19 });
Handle the response
Add success and error event listeners to handle events received from Airwallex.
1const element = mount('root');2element.on('success', (event) => {3 // Handle event on success4});56element.on('error', (event) => {7 // Handle event on error8});
On success, display a confirmation message. If onboarding fails with an error, display the appropriate message so the account holder can take action and try again. For a full list of events, see the onboarding element eventsJS reference.
The following table lists common error codes and recommended next steps.
| Error code | Error message | Next steps |
|---|---|---|
| INIT_ERROR | No <parameter> provided | Check the required init()JS options. |
| INIT_ERROR | Failed to authorize | Confirm that the clientId, env, codeVerifier and authCode passed in the init()JS function are valid. |
| INIT_ERROR | Auth timeout | Check your network connection. If it is stable, contact Airwallex support. |
| UNAUTHORIZED | Failed to refresh token | The refreshToken might be expired (currently one hour). Redo the entire flow to get a new authCode, initialize the SDK, and create the element again. |
| CREATE_ELEMENT_ERROR | init() must be called before createElement() | Confirm you have correctly loaded the SDK script using the init() function. |
| CREATE_ELEMENT_ERROR | CreateElement with type <type> not supported | Check the supported typesJS. |
| MOUNT_ELEMENT_ERROR | Cannot find element with DOM element id: <id> | Check whether the container DOM id or the DOM element passed in the mount() function is valid. |
| SUBMIT_FAILED | Internal API error: Failed to submit form. | Retry or contact Airwallex support. |
| UNKNOWN | Unknown error | Retry or contact Airwallex support. |
| API_ERROR | <API_name> API error | Error occurred when calling internal API. Retry or contact Airwallex support. |
| - (Console message only) | Please initialize Airwallex SDK | Confirm you have correctly loaded the SDK script using the init() function. |
Test your integration
Test your integration for various success and error scenarios in the sandbox environment before going to production.
Example integrations
Explore a full, working code sample of an integration built using React.
Troubleshoot
For troubleshooting tips, see Airwallex.js error codes.
Next steps
Now that your embedded component integration is set up and tested, you can:
- Subscribe to account status webhooks to receive real-time notifications when onboarding completes or an RFI is raised.
- Handle onboarding RFIs if Airwallex requests additional information from the account holder.