Create a batch transfer
Airwallex Batch Transfers allows you to create multiple transfers in bulk to streamline your transaction processing and reconciliation, and leverage different funding sources such as the Wallet or Linked Bank Account. Easily manage multiple transfers to recipients in various countries/regions and in various currencies to multiple beneficiaries for payroll runs and supplier payments. As a platform, you can bring your customers onto Airwallex and enhance your product offering by creating Batch Transfers on their behalf. Learn how to programmatically create batch transfers with our Batch Transfer API endpoints API in the following sections.
New feature: Airwallex supports batch transfers created via API to be routed through the transfer approval workflow set up on the Airwallex account. Learn more in Manage approvals for batch transfers.
Before you begin
- Obtain your access token API by authenticating to Airwallex using your unique Client ID and API key. You will need the access token to make API calls.
- Check out Payout Network for supported regions and currencies, and the country guides under it for more details on transfer methods, delivery times, and other country specific details.
- As a platform, you can call all Batch Transfers API endpoints on behalf of your connected accounts by specifying the connected account's open ID (in the format
acct_xxxxxx) in thex-on-behalf-ofheader of your API request. To learn about how you can register as a platform and set up this solution, see Global Treasury and Global Finance.
Step 1: Create a batch transfer
Call Create a batch transfer API with the required funding source and batch information (name, remarks, request id, transfer date) to create a batch transfer. Please find below further considerations on some of the parameters:
-
funding_source: funding source details should only be provided in this object if the batch transfer is to be funded via direct debit from Linked Account. Do not specify any parameters for Wallet as the funding source.id: Unique ID of your Linked Account as returned in Create a Linked Account API.deposit_type: Should be eitherDIRECT_DEBITorFASTER_DIRECT_DEBIT. Deposit type will default toDIRECT_DEBITif not specified. See direct debit flight times to understand difference between the two deposit types.
-
transfer_date: current or future date (ISO 8601 format) for when the batch transfer should be processed. If left blank, the transfer date will default to the earliest possible date.To dispatch a batch transfer as soon as possible, omit
transfer_date. Settingtransfer_date(including today's date) routes the batch transfer through scheduled-transfer logic and is not equivalent to omitting the field.transfer_dateis interpreted in your request account owning entity timezone. For related lifecycle behavior and timing details, see Batch transfer statuses, Fund deduction, and Funding and Settlement Models.
Transfer items with the same source and transfer currency can support transfer dates up to 120 days into the future; whereas transfer items with currency conversions can support transfer dates up to 2 days into the future (varies by currency pairs). Longer tenors up to 180 days (varies by currency pair) are possible with our FX forwards product for Australian or Hong Kong customers, but additional regulatory restrictions and application/review process may apply. Please confirm the acceptable value dates by currency pair with your Account Manager. Since all transfer items within a batch are scheduled to a single transfer date, you may get validation errors for transfer items due to invalid transfer dates.
For batch transfers with approval flows, the transfer_date will be updated if it was approved after the original specified date; at which point the batch transfer status transitions to SCHEDULED and transfer_date is fixed.
In the response, you will see the batch transfer status is DRAFTING. Next, you can add transfer items (Step 3) to the batch you just created.
Example request
1curl -X POST https://api-demo.airwallex.com/api/v1/batch_transfers/create \2 -H 'Content-Type: application/json' \3 -H 'Authorization: Bearer {{ACCESS_TOKEN}}' \4 -d '{5 "funding_source": {6 "deposit_type": "DIRECT_DEBIT",7 "id": "8365ea88-2946-4877-abe1-e02a1015288d"8 },9 "metadata": {10 "order_id": "0123456789"11 },12 "name": "batch-name",13 "remarks": "Any information",14 "request_id": "7f687fe6-dcf4-4462-92fa-80335301d911"15 }'
If you are registered as a platform account, you can call this endpoint on behalf of your connected accounts by specifying the open ID in the x-on-behalf-of header.
Example response
1{2 "funding": {3 "deposit_type": "DIRECT_DEBIT",4 "funding_source_id": "b3856846-31b0-44d8-855d-e0eedf532282",5 "status": "SCHEDULED"6 },7 "id": "d9af1614-a6a1-4d45-aae7-6858fc6d9ede",8 "metadata": {9 "order_id": "0123456789"10 },11 "name": "batch-name",12 "remarks": "Any information",13 "request_id": "7f687fe6-dcf4-4462-92fa-80335301d911",14 "short_reference_id": "B231018-TMA1RTC",15 "status": "DRAFTING",16 "total_item_count": 0,17 "transfer_date": "2024-01-24",18 "updated_at": "2024-01-24T18:00:02+1100",19 "valid_item_count": 020}21
Step 2: Prepare required beneficiary information
Before adding transfer items to a batch, you will need to prepare the required beneficiary information, which can vary depending on the payout country/currency, transfer method, local clearing system, beneficiary type.
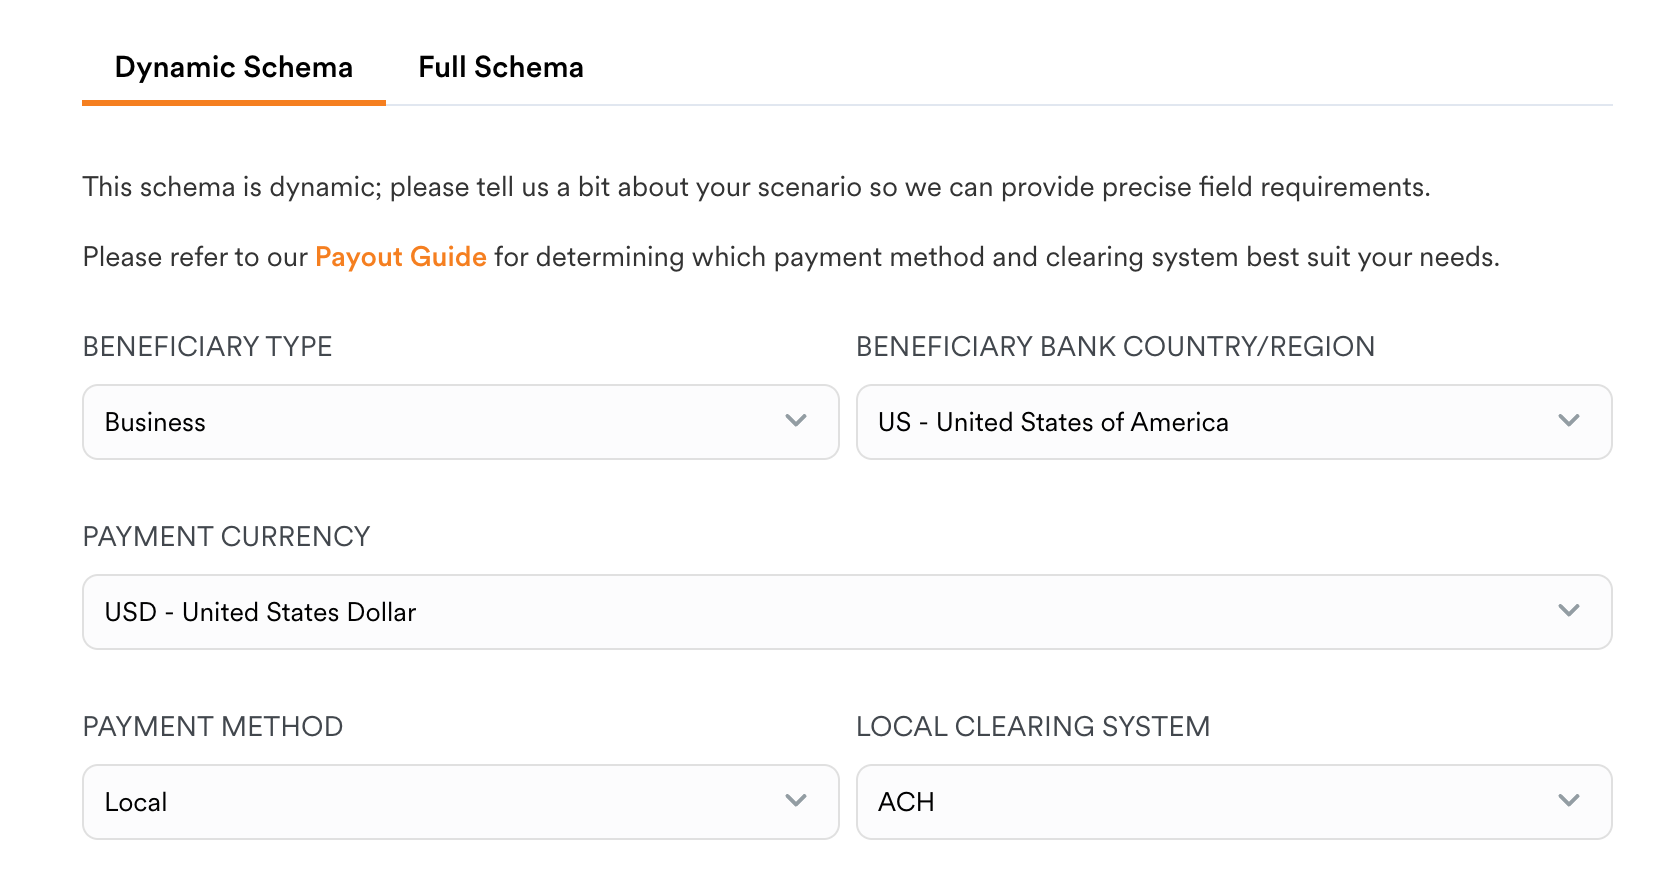
Our dynamic schema API allows you to obtain precise field requirements specific to the intended payout scenario. Refer to the screenshot below on which fields you can specify to generate the schema.
The dynamic schema comes in handy when you are checking for a handful of payout scenarios. To obtain our full schema for beneficiaries programmatically in a JSON payload, you can call Get the API schema API to retrieve the required fields and validation rules, and/or Get the form schema API to retrieve suggested specifications on the UI components to render the fields along with the corresponding validation rules. See Using API and form schemas to learn more.
Furthermore, beneficiary information can be saved beforehand and used directly when adding transfer items to a batch by specifying the beneficiary_id instead (see Step 3).
Step 3: Add items to a batch
After creating a batch transfer, you can call Add items to a batch API to add transfer items to a batch. You may add a maximum of 100 transfer items at a time, up to a maximum total of 1,000 transfer items per batch.
Each batch transfer item requires the same information required to create a transfer. Please refer to Step 2 in Create a transfer for further details. Note that you do not need to specify transfer_date for each item as the transfer_date is set at the batch transfer level. If your funding source is a Linked Account, please make sure to specify the same source_currency for all items in the batch.
Example request
1curl -X POST https://api-demo.airwallex.com/api/v1/batch_transfers/d9af1614-a6a1-4d45-aae7-6858fc6d9ede/add_items \2 -H 'Content-Type: application/json' \3 -H 'Authorization: Bearer {{ACCESS_TOKEN}}' \4 -d '{5 "items": [6 {7 "beneficiary": {8 "additional_info": {9 "personal_email": "[email protected]"10 },11 "address": {12 "city": "Melbourne",13 "country_code": "AU",14 "postcode": "3000",15 "state": "VIC",16 "street_address": "18 William Street"17 },18 "bank_details": {19 "account_currency": "AUD",20 "account_name": "John Walker",21 "account_number": "716978952",22 "account_routing_type1": "bsb",23 "account_routing_value1": "082401",24 "bank_country_code": "AU",25 "local_clearing_system": "BANK_TRANSFER"26 },27 "company_name": "Complete Concrete Pty Ltd",28 "entity_type": "COMPANY"29 },30 "metadata": {31 "order_id": "0123456789"32 },33 "transfer_amount": "100.00",34 "transfer_currency": "AUD",35 "transfer_method": "LOCAL",36 "quote_id": "string",37 "reason": "travel",38 "reference": "INV-123456",39 "remarks": "",40 "request_id": "722fc382-3025-4da4-b6b4-801b2295eeb0",41 "source_currency": "AUD"42 },43 {44 "beneficiary": {45 "additional_info": {46 "personal_email": "[email protected]"47 },48 "address": {49 "city": "Seattle",50 "country_code": "US",51 "postcode": "98104",52 "state": "US-VT",53 "street_address": "412 5th Avenue"54 },55 "bank_details": {56 "account_currency": "USD",57 "account_name": "John Walker",58 "account_number": "50001121",59 "account_routing_type1": "aba",60 "account_routing_value1": "021000021",61 "bank_country_code": "US",62 "local_clearing_system": "ACH"63 },64 "company_name": "Complete Concrete Pty Ltd",65 "entity_type": "COMPANY"66 },67 "metadata": {68 "order_id": "0123456789"69 },70 "transfer_amount": "100.00",71 "transfer_currency": "USD",72 "transfer_method": "LOCAL",73 "quote_id": "string",74 "reason": "travel",75 "reference": "INV-123456",76 "remarks": "",77 "request_id": "b0212b43-4e77-4d16-ba00-ee7f398506e5",78 "source_currency": "AUD"79 },80 {81 "beneficiary": {82 "additional_info": {83 "personal_email": "[email protected]"84 },85 "address": {86 "city": "Seattle",87 "country_code": "US",88 "postcode": "98104",89 "state": "US-VT",90 "street_address": "412 5th Avenue"91 },92 "bank_details": {93 "account_currency": "USD",94 "account_name": "John Walker",95 "account_number": "50001121",96 "account_routing_type1": "aba",97 "account_routing_value1": "021000021",98 "bank_country_code": "US",99 "local_clearing_system": "ACH"100 },101 "company_name": "Complete Concrete Pty Ltd",102 "entity_type": "COMPANY"103 },104 "metadata": {105 "order_id": "0123456789"106 },107 "transfer_amount": "100.00",108 "transfer_currency": "USD",109 "transfer_method": "LOCAL",110 "quote_id": "string",111 "reason": "travel",112 "reference": "INV-123456",113 "remarks": "",114 "request_id": "40d90756-c0f1-45f7-a02e-0023b648fcf0",115 "source_currency": "AUD"116 },117 {118 "beneficiary": {119 "additional_info": {120 "personal_email": "[email protected]"121 },122 "address": {123 "city": "Seattle",124 "country_code": "US",125 "postcode": "98104",126 "state": "xxxxx",127 "street_address": "412 5th Avenue"128 },129 "bank_details": {130 "account_currency": "USD",131 "account_name": "John Walker",132 "account_number": "50001121",133 "account_routing_type1": "aba",134 "account_routing_value1": "021000021",135 "bank_country_code": "US",136 "local_clearing_system": "ACH"137 },138 "company_name": "Complete Concrete Pty Ltd",139 "entity_type": "COMPANY"140 },141 "metadata": {142 "order_id": "0123456789"143 },144 "transfer_amount": "100.00",145 "transfer_currency": "USD",146 "transfer_method": "LOCAL",147 "reason": "travel",148 "reference": "INV-123456",149 "remarks": "",150 "request_id": "20883ea8-ce1c-4058-a4f7-daa42d305bae",151 "source_currency": "AUD"152 }153 ]154 }'
If you are registered as a platform account, you can call this endpoint on behalf of your connected accounts by specifying the open ID in the x-on-behalf-of header.
Example response
1{2 "funding": {3 "deposit_type": "DIRECT_DEBIT",4 "funding_source_id": "b3856846-31b0-44d8-855d-e0eedf532282",5 "status": "SCHEDULED"6 },7 "id": "d9af1614-a6a1-4d45-aae7-6858fc6d9ede",8 "metadata": {9 "order_id": "0123456789"10 },11 "name": "batch-name",12 "remarks": "Any information",13 "request_id": "7f687fe6-dcf4-4462-92fa-80335301d911",14 "short_reference_id": "B231018-TMA1RTC",15 "status": "DRAFTING",16 "total_item_count": 4,17 "transfer_date": "2024-01-24",18 "updated_at": "2024-01-24T18:00:02+1100",19 "valid_item_count": 320}
Total and valid item count
Within the response, there are two item counts to confirm the number of transfer items added to the batch:
total_item_count: the total number of items in the batch.valid_item_count: the number of items that passed our validation schema in the batch.
If the two item counts equal each other, then all transfer items are valid and you can either get a quote for this batch (Step 4) or submit the batch (Step 7) directly.
If valid_item_count is less than total_item_count, you can still quote and submit valid items in the batch; alternatively, you can preview all items within the batch (Step 5) to identify the invalid items and delete items (Step 6) before submitting the batch (Step 7).
Step 4: Quote a batch transfer (optional)
After adding valid transfer items to the batch, you can call Quote a batch transfer API to get quotes to lock the conversion rates for valid items in the batch. Please note that this is not a required step.
- If you have quoted before submitting the batch. You must always ensure to submit before the quotes expire; otherwise, you will receive a
quote_expirederror. In that case, you can call quote a batch transfer to obtain a new quote and submit the batch again; - If you have not quoted before submitting the batch, all transfer items will be quoted automatically upon submission and you can see the quote details in the response.
In the request, you can specify a customised quote validity. The value will default to MIN_1 if not specified.
In the response, you will see a quote_summary with the following useful parameters:
expires_at: The expiration time of the quoteslast_quoted_at: The time this batch transfer last quotedquotes: Details of each quote based on currency pairsvalidity: Quote validity period in the request
For batch transfers with approval flows, quotes will be updated if the batch transfer is approved after the quote expires; at which point the batch transfer status transitions to SCHEDULED, and quotes are fixed.
Example request
1curl -X POST https://api-demo.airwallex.com/api/v1/batch_transfers/d9af1614-a6a1-4d45-aae7-6858fc6d9ede/quote \2 -H 'Content-Type: application/json' \3 -H 'Authorization: Bearer {{ACCESS_TOKEN}}' \4 -d '{5 "validity": "MIN_15"6 }'
If you are registered as a platform account, you can call this endpoint on behalf of your connected accounts by specifying the open ID in the x-on-behalf-of header.
Example response
1{2 "funding": {3 "deposit_type": "DIRECT_DEBIT",4 "funding_source_id": "b3856846-31b0-44d8-855d-e0eedf532282",5 "status": "SCHEDULED"6 },7 "id": "d9af1614-a6a1-4d45-aae7-6858fc6d9ede",8 "metadata": {9 "order_id": "0123456789"10 },11 "name": "batch-name",12 "quote_summary": {13 "expires_at": "2024-01-24T18:00:02+0000",14 "last_quoted_at": "2024-01-24T18:03:02+0000",15 "quotes": [16 {17 "amount_beneficiary_receives": 100.0,18 "amount_payer_pays": 100.0,19 "fee_amount": 0,20 "fee_currency": "AUD",21 "transfer_currency": "AUD",22 "source_currency": "AUD"23 },24 {25 "amount_beneficiary_receives": 200.0,26 "amount_payer_pays": 308.44,27 "client_rate": 0.648414,28 "currency_pair": "AUDUSD",29 "fee_amount": 0,30 "fee_currency": "AUD",31 "transfer_currency": "USD",32 "source_currency": "AUD"33 }34 ],35 "validity": "MIN_15"36 },37 "remarks": "Any information",38 "request_id": "7f687fe6-dcf4-4462-92fa-80335301d911",39 "short_reference_id": "B231018-TMA1RTC",40 "status": "DRAFTING",41 "total_item_count": 4,42 "transfer_date": "2024-01-24",43 "updated_at": "2024-01-24T18:00:02+1100",44 "valid_item_count": 345}
Step 5: List all items within a batch (optional)
Call List all items within a batch API to preview all items added to the batch transfer. You can call this endpoint at any time, before or after submitting the batch. Please note that this is not a required step.
Example request
1curl -G https://api-demo.airwallex.com/api/v1/batch_transfers/d9af1614-a6a1-4d45-aae7-6858fc6d9ede/itemspage_size=1000&page=YWZ0ZXI9ZjY0MjZkYzctYzcxMi00YjllLThlYzQtZTVmM2YzOTQwZTBk \2 -H 'Authorization: Bearer {{ACCESS_TOKEN}}'
If you are registered as a platform account, you can call this endpoint on behalf of your connected accounts by specifying the open ID in the x-on-behalf-of header.
Example response
1{2 "items": [3 {4 "id": "461c6d8a-ff3b-4e86-9a4b-3a46494ccd48",5 "request_id": "40d90756-c0f1-45f7-a02e-0023b648fcf0",6 "status": "VALIDATED",7 "transfer_draft": {8 "amount_beneficiary_receives": 100.0,9 "amount_payer_pays": 154.22,10 "beneficiary": {11 "additional_info": {12 "personal_email": "[email protected]"13 },14 "address": {15 "city": "Seattle",16 "country_code": "US",17 "postcode": "98104",18 "state": "US-VT",19 "street_address": "412 5th Avenue"20 },21 "bank_details": {22 "account_currency": "USD",23 "account_name": "John Walker",24 "account_number": "50001121",25 "account_routing_type1": "aba",26 "account_routing_value1": "021000021",27 "bank_country_code": "US",28 "bank_name": "JPMORGAN CHASE BANK, NATIONAL ASSOCIATION",29 "local_clearing_system": "ACH"30 },31 "company_name": "Complete Concrete Pty Ltd",32 "entity_type": "COMPANY"33 },34 "fee_amount": 0,35 "fee_currency": "AUD",36 "fee_paid_by": "PAYER",37 "metadata": {38 "order_id": "0123456789"39 },40 "payer": {41 "additional_info": {42 "business_incorporation_date": "1986-04-22",43 "business_registration_number": "CN - 730-58-1527",44 "business_registration_type": "COMPANY"45 },46 "address": {47 "city": "Shanghai",48 "country_code": "AU",49 "postcode": "SH-09090",50 "state": "SH",51 "street_address": "Shanghai St, Shanghai St"52 },53 "company_name": "Stokes, Gerhold and Mayer",54 "entity_type": "COMPANY"55 },56 "transfer_amount": 100.0,57 "transfer_currency": "USD",58 "transfer_method": "LOCAL",59 "reason": "travel",60 "reference": "INV-123456",61 "request_id": "40d90756-c0f1-45f7-a02e-0023b648fcf0",62 "short_reference_id": "P240320-MEX719O",63 "source_amount": 154.22,64 "source_currency": "AUD"65 },66 "updated_at": "2024-01-24T18:00:02+0000"67 },68 {69 "id": "247fb034-533e-48f0-b434-72fa3c2619ac",70 "request_id": "b0212b43-4e77-4d16-ba00-ee7f398506e5",71 "status": "VALIDATED",72 "transfer_draft": {73 "amount_beneficiary_receives": 100.0,74 "amount_payer_pays": 154.22,75 "beneficiary": {76 "additional_info": {77 "personal_email": "[email protected]"78 },79 "address": {80 "city": "Seattle",81 "country_code": "US",82 "postcode": "98104",83 "state": "US-VT",84 "street_address": "412 5th Avenue"85 },86 "bank_details": {87 "account_currency": "USD",88 "account_name": "John Walker",89 "account_number": "50001121",90 "account_routing_type1": "aba",91 "account_routing_value1": "021000021",92 "bank_country_code": "US",93 "bank_name": "JPMORGAN CHASE BANK, NATIONAL ASSOCIATION",94 "local_clearing_system": "ACH"95 },96 "company_name": "Complete Concrete Pty Ltd",97 "entity_type": "COMPANY"98 },99 "fee_amount": 0,100 "fee_currency": "AUD",101 "fee_paid_by": "PAYER",102 "metadata": {103 "order_id": "0123456789"104 },105 "payer": {106 "additional_info": {107 "business_incorporation_date": "1986-04-22",108 "business_registration_number": "CN - 730-58-1527",109 "business_registration_type": "COMPANY"110 },111 "address": {112 "city": "Shanghai",113 "country_code": "AU",114 "postcode": "SH-09090",115 "state": "SH",116 "street_address": "Shanghai St, Shanghai St"117 },118 "company_name": "Stokes, Gerhold and Mayer",119 "entity_type": "COMPANY"120 },121 "transfer_amount": 100.0,122 "transfer_currency": "USD",123 "transfer_method": "LOCAL",124 "reason": "travel",125 "reference": "INV-123456",126 "request_id": "b0212b43-4e77-4d16-ba00-ee7f398506e5",127 "short_reference_id": "P240320-BTAUJ0F",128 "source_amount": 154.22,129 "source_currency": "AUD"130 },131 "updated_at": "2024-01-24T18:00:02+0000"132 },133 {134 "id": "3372184b-1d00-4a9f-9231-d04d22da439d",135 "request_id": "722fc382-3025-4da4-b6b4-801b2295eeb0",136 "status": "VALIDATED",137 "transfer_draft": {138 "amount_beneficiary_receives": 100.0,139 "amount_payer_pays": 100.0,140 "beneficiary": {141 "additional_info": {142 "personal_email": "[email protected]"143 },144 "address": {145 "city": "Melbourne",146 "country_code": "AU",147 "postcode": "3000",148 "state": "VIC",149 "street_address": "18 William Street"150 },151 "bank_details": {152 "account_currency": "AUD",153 "account_name": "John Walker",154 "account_number": "716978952",155 "account_routing_type1": "bsb",156 "account_routing_value1": "082401",157 "bank_country_code": "AU",158 "bank_name": "National Australia Bank Limited",159 "local_clearing_system": "BANK_TRANSFER"160 },161 "company_name": "Complete Concrete Pty Ltd",162 "entity_type": "COMPANY"163 },164 "fee_amount": 0,165 "fee_currency": "AUD",166 "fee_paid_by": "PAYER",167 "metadata": {168 "order_id": "0123456789"169 },170 "payer": {171 "additional_info": {172 "business_incorporation_date": "1986-04-22",173 "business_registration_number": "CN - 730-58-1527",174 "business_registration_type": "COMPANY"175 },176 "address": {177 "city": "Shanghai",178 "country_code": "AU",179 "postcode": "SH-09090",180 "state": "SH",181 "street_address": "Shanghai St, Shanghai St"182 },183 "company_name": "Stokes, Gerhold and Mayer",184 "entity_type": "COMPANY"185 },186 "transfer_amount": 100.0,187 "transfer_currency": "AUD",188 "transfer_method": "LOCAL",189 "reason": "travel",190 "reference": "INV-123456",191 "request_id": "722fc382-3025-4da4-b6b4-801b2295eeb0",192 "short_reference_id": "P240320-IVLGVL2",193 "source_amount": 100.0,194 "source_currency": "AUD"195 },196 "updated_at": "2024-01-24T18:00:02+0000"197 }198 ],199 "page_before": "YmVmb3JlPTg0ZjVmZTUzLWFkZTYtNGRiMS05Y2M1LWI4OTFiZjhkYmU1Mw=="200}
Details of each transfer item in the batch are returned in the response. Please find below further considerations on some parameters within the items array:
id: System generated ID for each item in the batch, which can be used to delete items (Step 6).Errors: If the batch item status isVALIDATION_FAILEDorBOOKING_FAILED. See Batch transfer item errors for detailed descriptions of each error code.status: The status for each batch item, which can be one ofVALIDATION_FAILED,VALIDATED,BOOKING,BOOKED,BOOKING_FAILED. See Batch transfer item statuses for detailed descriptions of each status.transfer_draft: After obtaining a quote, you can preview the draft details of each transfer item before the batch transfer isBOOKED; after which this parameter is no longer available and you should call Get transfer by ID API withtransfer_idto retrieve transfer details.transfer_id: System generated ID for eachBOOKEDitem in the batch, which can be used to retrieve transfer details by calling Get transfer by ID API.
Step 6: Delete items within a batch (optional)
Before submitting a batch transfer, i.e. the batch transfer status is DRAFTING, you can call Delete items within a batch API with item_ids to delete invalid or wrong items in the batch. Please note that this is not a required step.
Example request
1curl -X POST https://api-demo.airwallex.com/api/v1/batch_transfers/d9af1614-a6a1-4d45-aae7-6858fc6d9ede/delete_items \2 -H 'Content-Type: application/json' \3 -H 'Authorization: Bearer {{ACCESS_TOKEN}}' \4 -d '{5 "item_ids": [6 "84f5fe53-ade6-4db1-9cc5-b891bf8dbe53"7 ]8 }'
If you are registered as a platform account, you can call this endpoint on behalf of your connected accounts by specifying the open ID in the x-on-behalf-of header.
Example response
1{2 "funding": {3 "deposit_type": "DIRECT_DEBIT",4 "funding_source_id": "b3856846-31b0-44d8-855d-e0eedf532282",5 "status": "SCHEDULED"6 },7 "id": "d9af1614-a6a1-4d45-aae7-6858fc6d9ede",8 "metadata": {9 "order_id": "0123456789"10 },11 "name": "batch-name",12 "quote_summary": {13 "expires_at": "2024-01-24T18:00:02+0000",14 "last_quoted_at": "2024-01-24T18:03:02+0000",15 "quotes": [16 {17 "amount_beneficiary_receives": 100.0,18 "amount_payer_pays": 100.0,19 "fee_amount": 0,20 "fee_currency": "AUD",21 "transfer_currency": "AUD",22 "source_currency": "AUD"23 },24 {25 "amount_beneficiary_receives": 200.0,26 "amount_payer_pays": 308.44,27 "client_rate": 0.648414,28 "currency_pair": "AUDUSD",29 "fee_amount": 0,30 "fee_currency": "AUD",31 "transfer_currency": "USD",32 "source_currency": "AUD"33 }34 ],35 "validity": "MIN_15"36 },37 "remarks": "Any information",38 "request_id": "7f687fe6-dcf4-4462-92fa-80335301d911",39 "short_reference_id": "B231018-TMA1RTC",40 "status": "DRAFTING",41 "total_item_count": 3,42 "transfer_date": "2024-01-24",43 "updated_at": "2024-01-24T18:00:02+1100",44 "valid_item_count": 345}
Step 7: Submit a batch transfer
Once you have added valid items to the batch transfer, you can call Submit a batch transfer API to submit the batch.
- If no approval is required, this batch will transition to
SCHEDULEDstatus and will be processed by Airwallex accordingly. - If approval is required, this batch will transition to
IN_APPROVALstatus.
In the response, you will see a funding object contains the following funding information:
deposit_type: If specified when creating the batch, the value can beDIRECT_DEBITorFASTER_DIRECT_DEBIT.failure_reason: If there is an error with the funding source, a failure reason will be returned. See Batch transfer direct debit deposit errors (asynchronous) for details.funding_source_id: The unique ID of your Linked Account if funded byDIRECT_DEBITorFASTER_DIRECT_DEBIT.status: The funding status of this batch transfer. Please see details in Funding Statuses.
After submitting the batch transfer, please ensure sufficient balance is available in your Wallet or Linked Account to cover the batch transfer amount (including fees). Once the batch is successfully funded, the system will start to book single transfers, which can be retrieved by calling Get transfer by ID API. See Transfer statuses for further details of each transfer item.
Example request
1curl -X POST https://api-demo.airwallex.com/api/v1/batch_transfers/d9af1614-a6a1-4d45-aae7-6858fc6d9ede/submit \2 -H 'Content-Type: application/json' \3 -H 'Authorization: Bearer {{ACCESS_TOKEN}}'
If you are registered as a platform account, you can call this endpoint on behalf of your connected accounts by specifying the open ID in the x-on-behalf-of header.
Example response
1{2 "funding": {3 "deposit_type": "DIRECT_DEBIT",4 "funding_source_id": "b3856846-31b0-44d8-855d-e0eedf532282",5 "status": "PROCESSING"6 },7 "id": "d9af1614-a6a1-4d45-aae7-6858fc6d9ede",8 "metadata": {9 "order_id": "0123456789"10 },11 "name": "batch-name",12 "quote_summary": {13 "expires_at": "2024-01-24T18:00:02+0000",14 "last_quoted_at": "2024-01-24T18:03:02+0000",15 "quotes": [16 {17 "amount_beneficiary_receives": 100.0,18 "amount_payer_pays": 100.0,19 "fee_amount": 0,20 "fee_currency": "AUD",21 "transfer_currency": "AUD",22 "source_currency": "AUD"23 },24 {25 "amount_beneficiary_receives": 200.0,26 "amount_payer_pays": 308.44,27 "client_rate": 0.648414,28 "currency_pair": "AUDUSD",29 "fee_amount": 0,30 "fee_currency": "AUD",31 "transfer_currency": "USD",32 "source_currency": "AUD"33 }34 ],35 "validity": "MIN_15"36 },37 "remarks": "Any information",38 "request_id": "7f687fe6-dcf4-4462-92fa-80335301d911",39 "short_reference_id": "B231018-TMA1RTC",40 "status": "SCHEDULED",41 "total_item_count": 3,42 "transfer_date": "2024-01-24",43 "updated_at": "2024-01-24T18:00:02+1100",44 "valid_item_count": 345}
Fund deduction
Note: Applicable to batch transfers using Wallet as the funding source only.
Generally under the pre-funding workflow, funds will be immediately deducted from the Wallet when batch transfers are submitted (including future dated batch transfers). If a batch transfer was initially created and submitted for approval, funds will be deducted from the Wallet when the status of the batch transfer transitions to SCHEDULED. Please ensure that you have sufficient balance in your Wallet when creating batch transfers.
Alternatively under the post-funding workflow, certain customers without sufficient balance are permitted to create batch transfers in advance. Funds will be deducted from the Wallet on transfer date from 9 AM, on a first-in first-out basis based on the earliest transfer_date, and the earliest created_at time. Funding will be retried every 30 minutes if wallet balance is insufficient.
To learn more about fund deduction models, please see Funding and Settlement Models.
Batch transfer fee
The fee component of a batch transfer item (similar to a transfer) is calculated by Airwallex and communicated back via fee_currency and fee_amount in the API response, while amount_payer_pays and amount_beneficiary_receives represent the actual amounts that you will pay and the recipient will receive respectively (with fees applied). If a batch transfer was initially created and submitted for approval, fee_amount, amount_payer_pays and amount_beneficiary_receives for each batch item are tentative based on the exchange rate at the time of creation until the batch transfer status changes to SCHEDULED, at which point the exchange rate is confirmed.
The batch transfer fee is set to be paid by the payer by default, while you can pass on the fees to the beneficiary instead by specifying BENEFICIARY for the fee_paid_by parameter in your request. See more details in required request information for a batch transfer item.
Errors
Airwallex uses conventional HTTP response codes API to indicate the success or failure of an API request.
A HTTP 400 status code indicates an error that has been triggered due to the information provided in the request. See Batch transfer error codes to learn about all possible errors associated with the HTTP 400 status when creating a batch transfer.