Authorize new customers
Enable new customers to create an Airwallex account and authorize your application in a single flow
To onboard new customers who don't have Airwallex accounts yet, implement the combined sign-up and authorization flow described below.
Use this flow when your users need to create a new Airwallex Business Account and authorize your application at the same time. This streamlines the onboarding experience by combining account creation and OAuth authorization into a single workflow.
Before you begin
Before implementing OAuth for new customers, ensure you have:
- Client ID and client secret credentials from Airwallex. Contact [email protected] to request credentials.
- Redirect URI whitelisted with Airwallex. Contact your partnerships manager to whitelist additional URIs.
- Required scopes determined for your integration. See Scopes for available options.
Create the combined sign-up and authorization flow
To enable users to create an Airwallex account and authorize your application in a single flow, implement a "Sign up with Airwallex" button.
-
Add a "Sign up with Airwallex" or "Connect with Airwallex" button to your user interface.
-
Configure the button to redirect users to the Airwallex OAuth authorization URL with the
sign_up=trueparameter:text1https://demo.airwallex.com/oauth/authorize?response_type=code&client_id=<YOUR_CLIENT_ID>&redirect_uri=<YOUR_REDIRECT_URI>&state=<YOUR_STATE>&scope=<REQUESTED_SCOPE_1>+<REQUESTED_SCOPE_2>&sign_up=trueReplace placeholders with your actual values. The
stateparameter prevents CSRF attacks - generate a unique value for each authorization request and validate it on callback. -
Direct users through the account creation and authorization process.
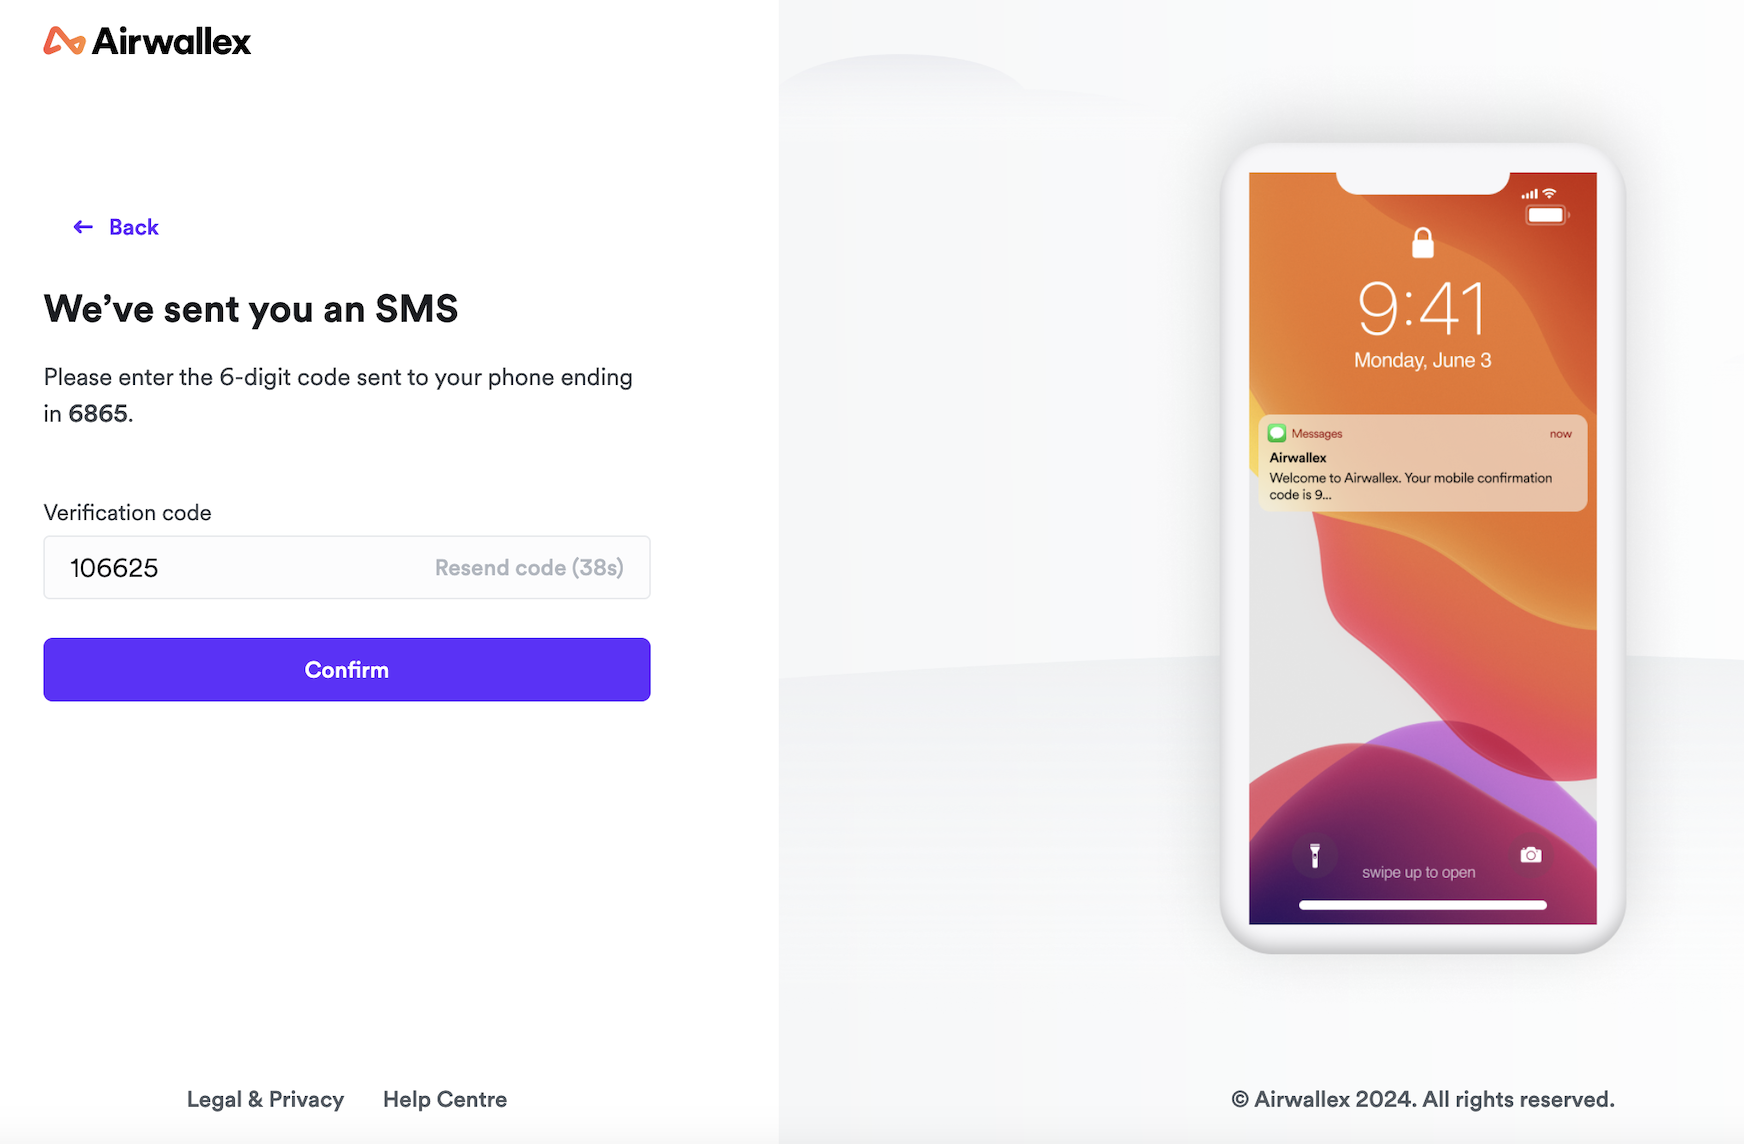
Users will first complete the Airwallex account sign-up process:
Fill in account details
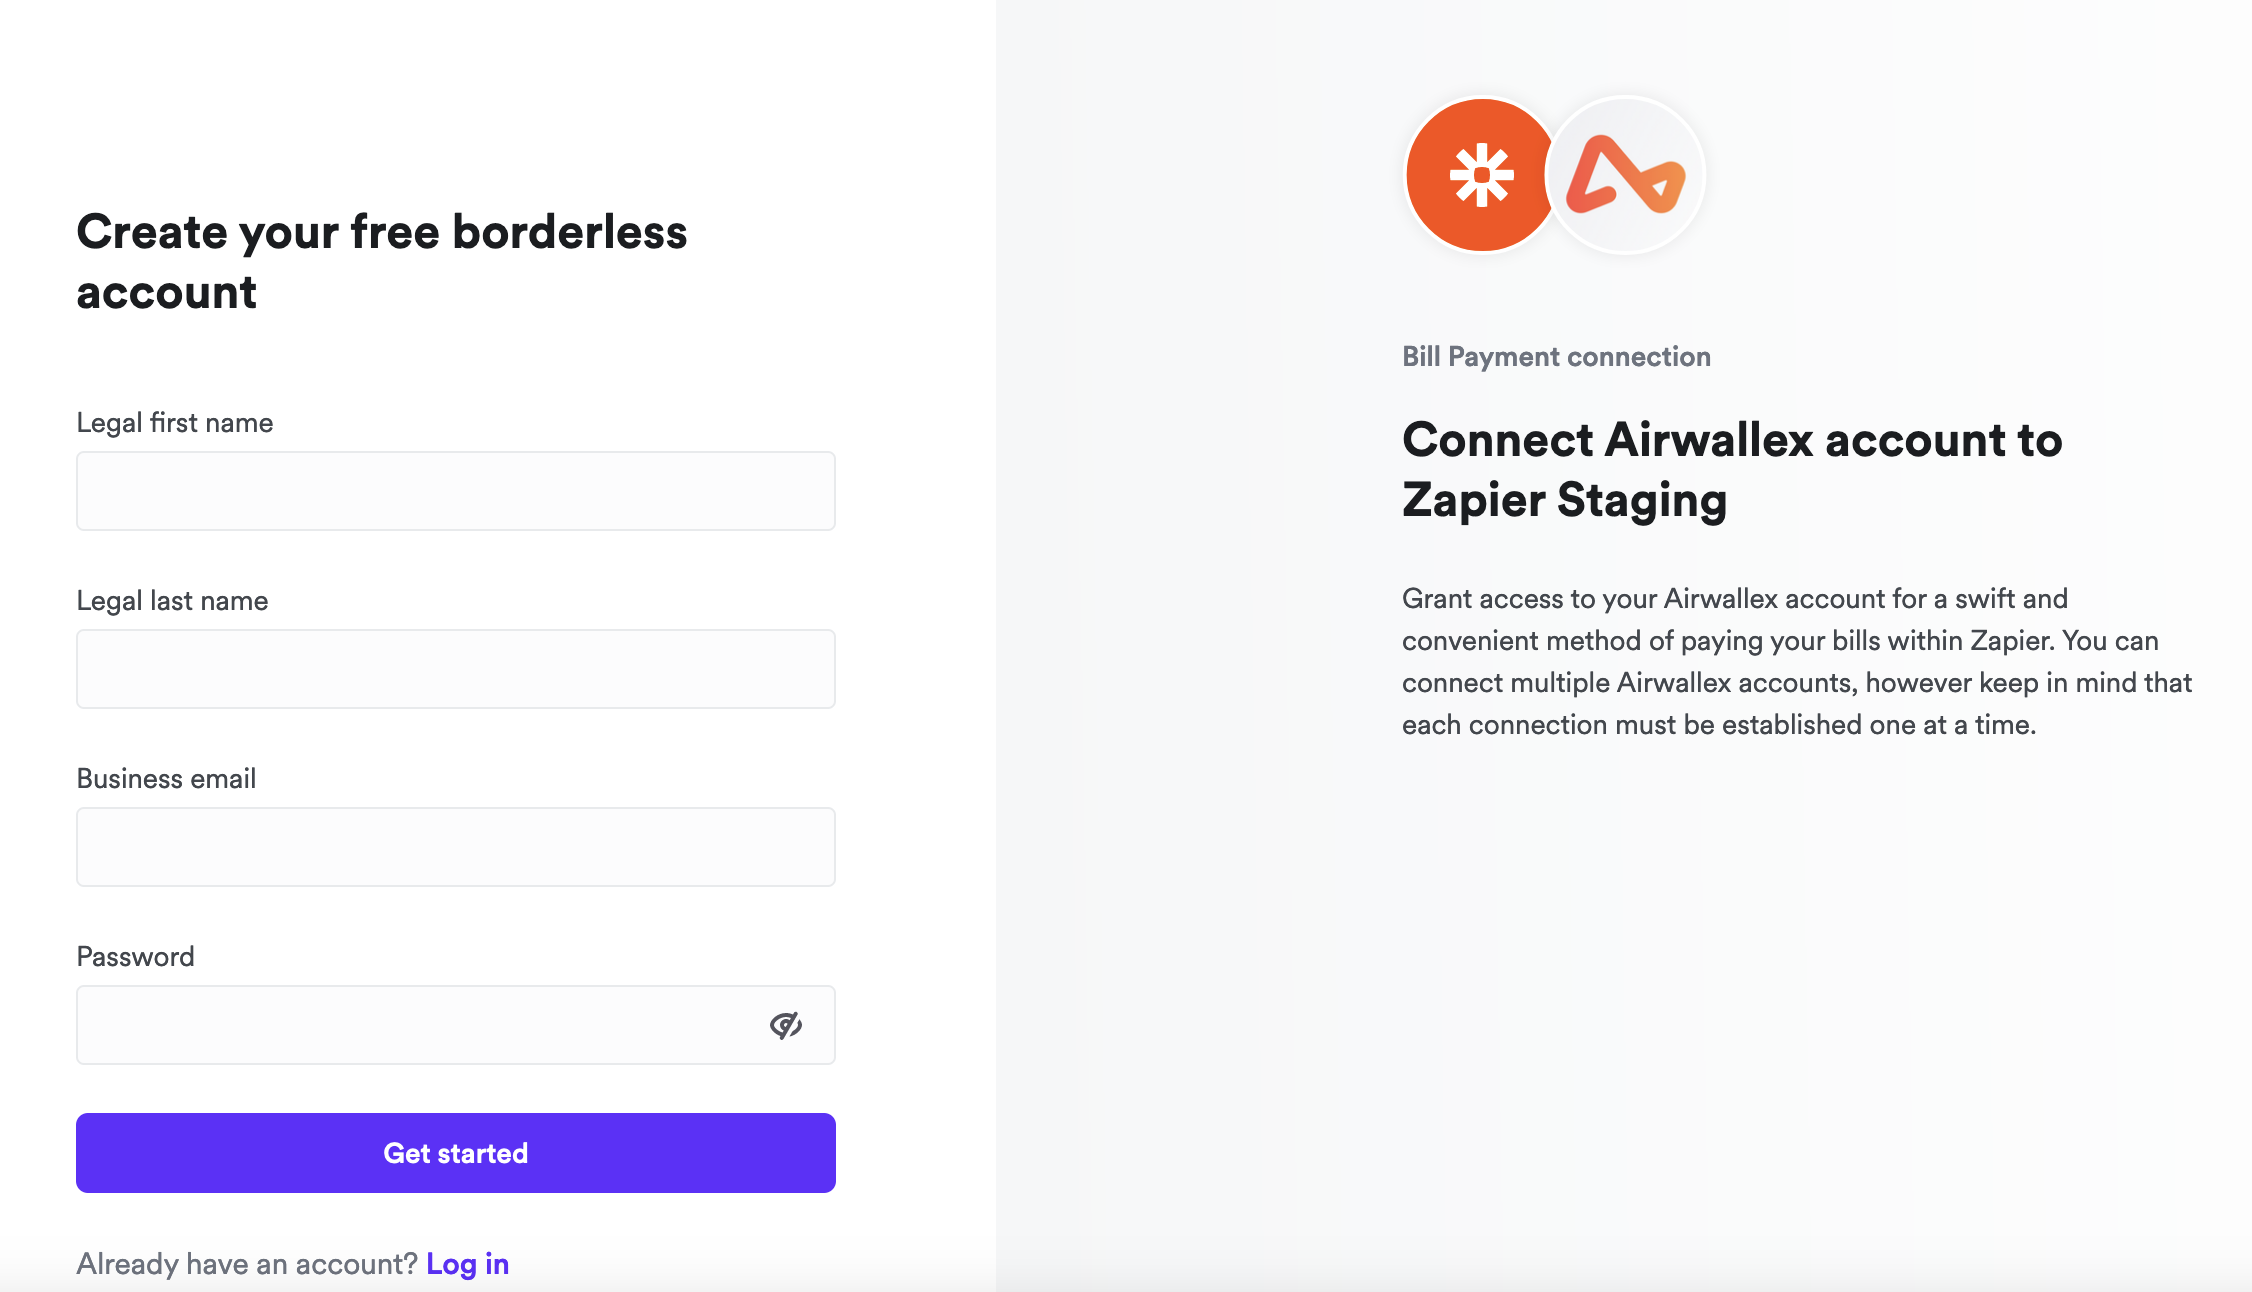
Complete 2FA verification
Specify account usage
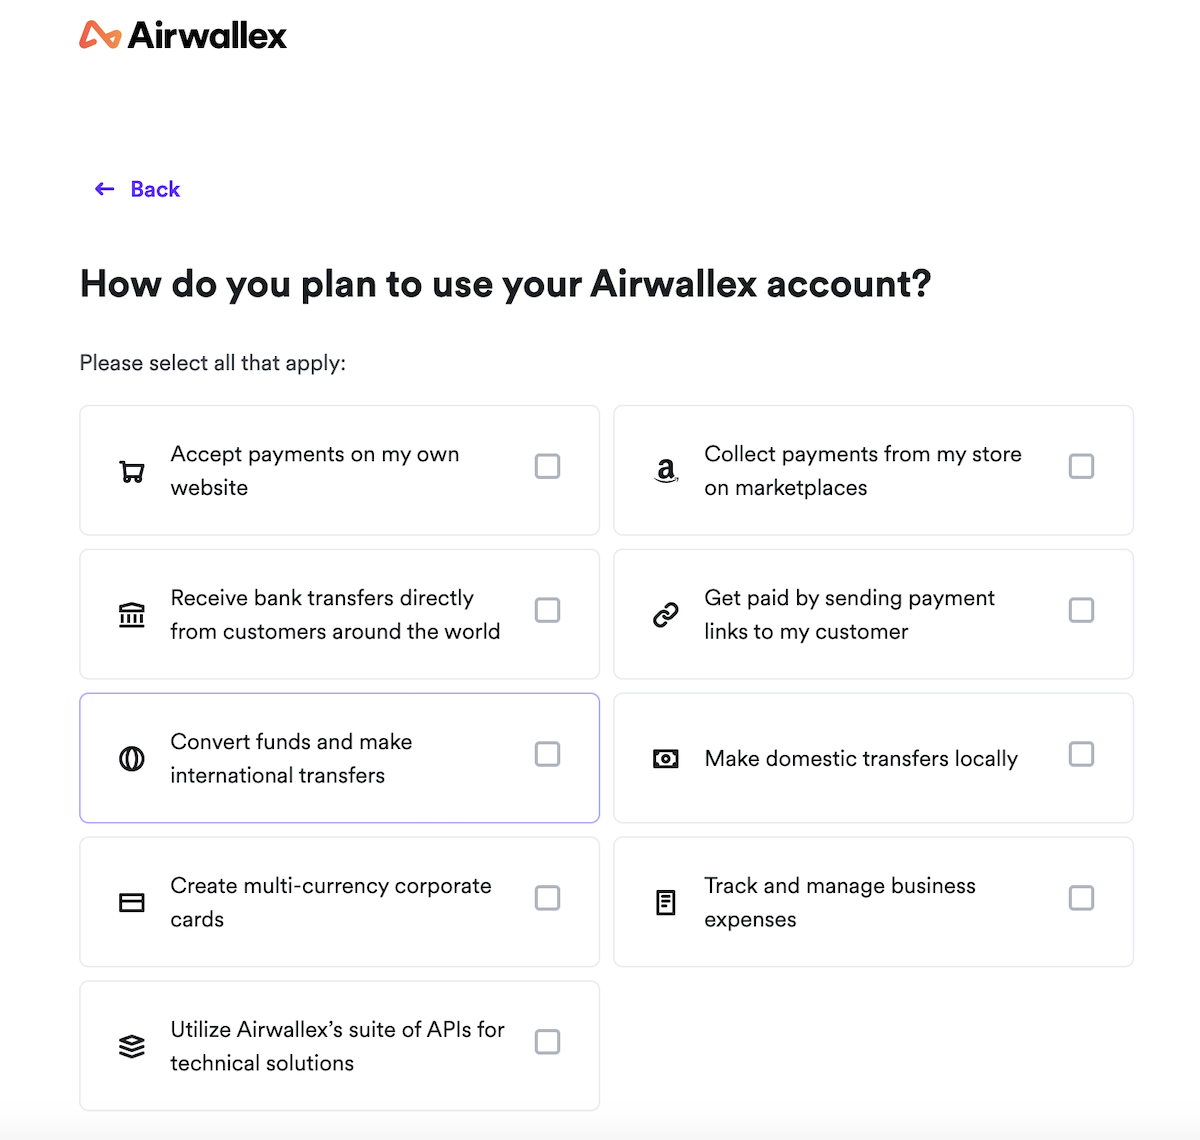
After account creation, users are automatically directed to the OAuth authorization screen:
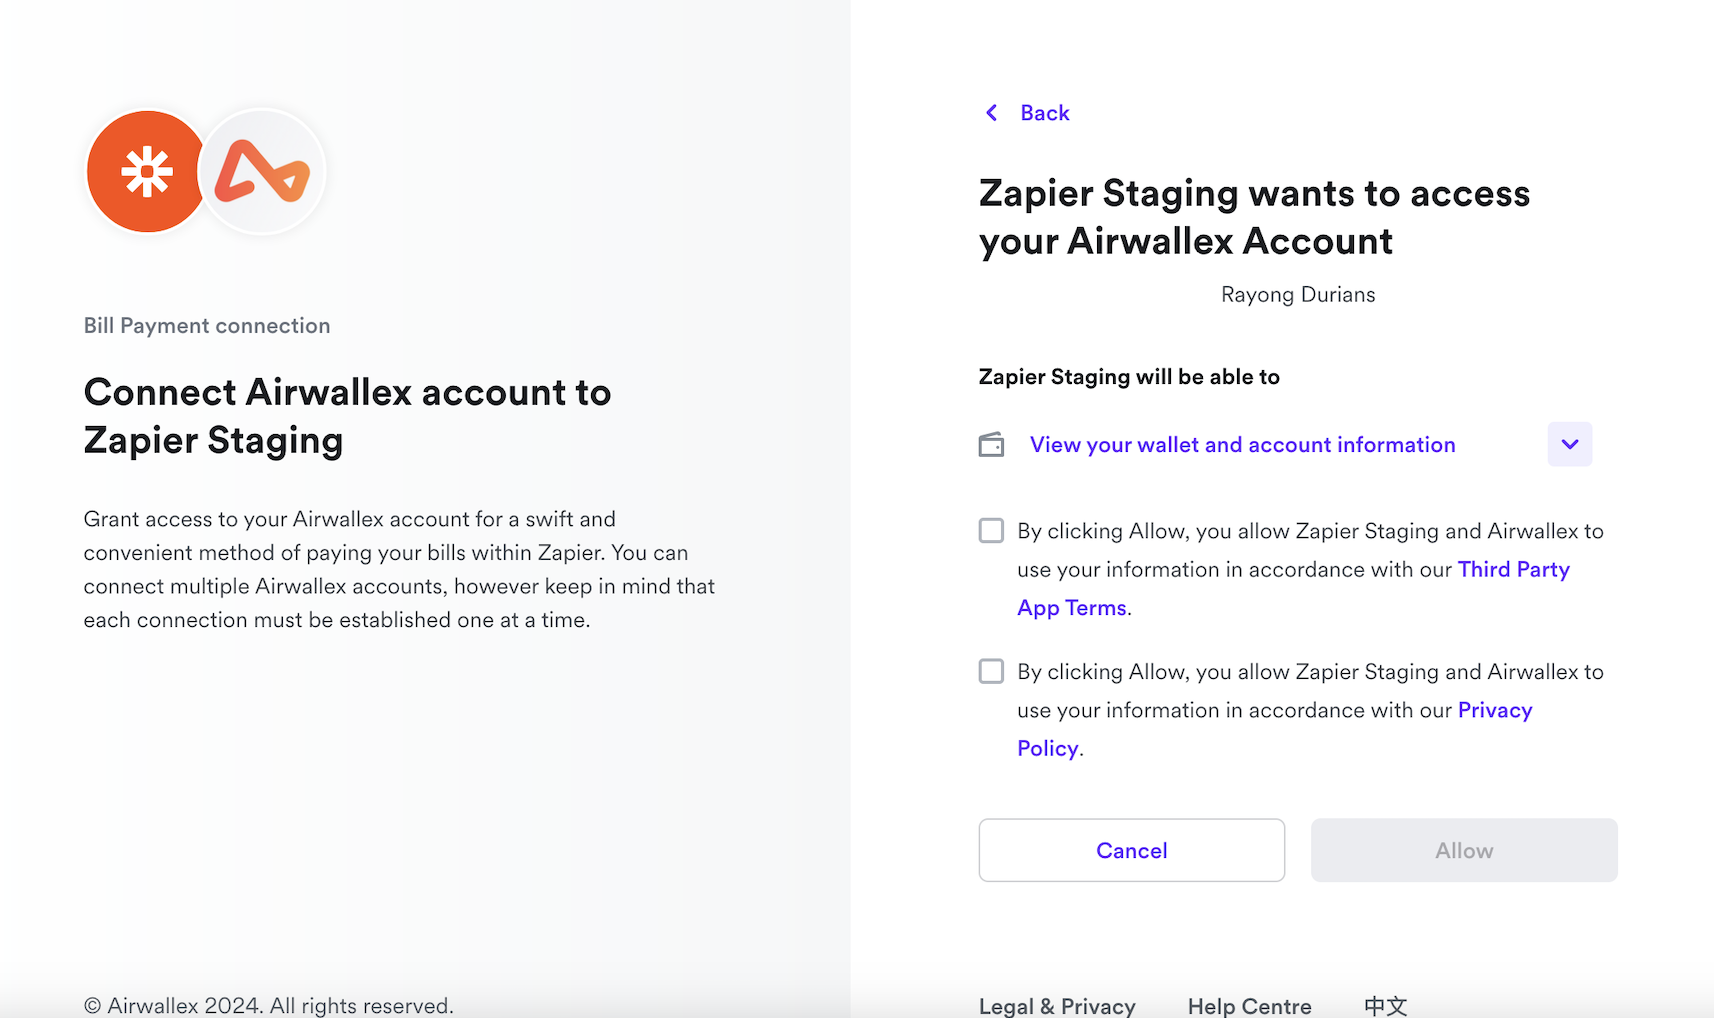
After authorization, Airwallex redirects users back to your redirect URI with an authorization code and state parameter:
1https://<YOUR_REDIRECT_URI>/?code=<AUTH_CODE>&state=<YOUR_STATE>
Once users grant authorization, you can redirect them back to your application and complete any remaining onboarding steps, such as:
- Invoking KYC/KYB flows using Airwallex embedded components.
- Completing required workflows on your platform.
Redirect URIs must be whitelisted for security purposes. Attempting to use a non-whitelisted redirect URI will result in an error.
Exchange authorization code for tokens
To obtain access and refresh tokens, exchange the authorization code with the Airwallex OAuth server.
-
Extract the authorization code from the redirect URL query parameter.
-
Validate that the returned
stateparameter matches the value you generated in step 2 above. -
Send a POST request to the token endpoint with your credentials and the authorization code:
Shell1curl -X POST https://api-demo.airwallex.com/oauth/token \2 -H 'Content-Type: application/x-www-form-urlencoded' \3 --data-urlencode 'client_id={{YOUR_CLIENT_ID}}' \4 --data-urlencode 'client_secret={{YOUR_CLIENT_SECRET}}' \5 --data-urlencode 'code={{AUTH_CODE}}' \6 --data-urlencode 'grant_type=authorization_code' \7 --data-urlencode 'redirect_uri={{YOUR_REDIRECT_URI}}'Note that
<YOUR_REDIRECT_URI>must match the one used to obtain the authorization code. -
Store the refresh token securely in your database and use the access token for API requests.
If the authorization code is valid, you will receive a response containing tokens:
1{2 "access_token": "eyJhbGciOiJIUzI1NiJ9.eyJzdWIiOiJ0b20iLCJyb2xlcyI6WyJ1c2VyIl0sImlhdCI6MTQ4ODQxNTI1NywiZXhwIjoxNDg4NDE1MjY3fQ.UHqau03y5kEk5lFbTp7J4a-U6LXsfxIVNEsux85hj-Q",3 "account_id": "acct_AcFEnD6CMgOvuFYLgFCw9A",4 "org_id": "org_1QJuNBuwTj-yMH_NZkE1OA",5 "expires_in": 300,6 "refresh_token": "TIg7rEHqjxP3WOkGGS2S-J1GxQnZiAe8VCF7r6G5JMJSC_0l9qU7nyHVPjaQd298H",7 "refresh_token_expires_in": 7776000,8 "scope": "r:awx_action:balances_view r:awx_action:settings.account_details_view r:awx_action:global_accounts_view",9 "token_type": "bearer"10}
The response includes:
access_token: Short-lived token (valid for 5 minutes) for API requestsrefresh_token: Long-lived token (valid for 90 days) for obtaining new access tokensaccount_id: The ID of the connected Airwallex account. Returned when any scopes other than Billing or Spend are requested.org_id: The ID of the connected Airwallex organization. Returned when Billing or Spend scopes are requested.expires_in: Access token expiration time in secondsrefresh_token_expires_in: Refresh token expiration time in seconds
org_id is returned when Billing or Spend scopes are authorized. account_id is returned when any other scopes are requested. Both fields may be present if you request a combination of scopes — for example, if you request both payment and billing scopes. When connecting webhooks, use org_id for Billing or Spend events and account_id for all other events.
Check token validity
To avoid unnecessary API calls with expired tokens, check token validity before making requests:
Option 1: Decode the JWT access token
1const jwt = require('jsonwebtoken');2const decoded = jwt.decode(accessToken);3const isExpired = decoded.exp * 1000 < Date.now();
Option 2: Track expires_in from the token response
1const tokenExpiresAt = Date.now() + (expiresIn * 1000);2const isExpired = Date.now() >= tokenExpiresAt;
Refresh the access token before it expires if you need continued access.
To use the access token (which is <YOUR_BEARER_TOKEN> in examples), include it in the Authorization header of API requests:
1curl -G https://api-demo.airwallex.com/api/v1/account \2 -H 'Authorization: Bearer {{ACCESS_TOKEN}}'
Refresh access tokens
To maintain ongoing access to the connected Airwallex account, regularly refresh access tokens before they expire.
-
Send a POST request to the token endpoint with your refresh token:
Shell1curl -X POST https://api-demo.airwallex.com/oauth/token \2 -H 'Content-Type: application/x-www-form-urlencoded' \3 --data-urlencode 'client_id={{YOUR_CLIENT_ID}}' \4 --data-urlencode 'client_secret={{YOUR_CLIENT_SECRET}}' \5 --data-urlencode 'grant_type=refresh_token' \6 --data-urlencode 'refresh_token={{REFRESH_TOKEN}}'Use the latest refresh token value from your previous call to
/oauth/token. -
Immediately store the new refresh token, replacing the previous one in your database.
-
Use the new access token for subsequent API requests.
The response contains new tokens:
1{2 "access_token": "eyJhbGciOiJIUzI1NiJ9.eyJzdWIiOiJ0b20iLCJyb2xlcyI6WyJ1c2VyIl0sImlhdCI6MTQ4ODQxNTI1NywiZXhwIjoxNDg4NDE1MjY3fQ.UHqau03y5kEk5lFbTp7J4a-U6LXsfxIVNEsux85h",3 "account_id": "acct_AcFEnD6CMgOvuFYLgFCw9A",4 "org_id": "org_1QJuNBuwTj-yMH_NZkE1OA",5 "expires_in": 300,6 "refresh_token": "i-IPN3DIkTfNJ3dSVy0ea-QOtMAt0eVdx5OccrD-MNFJcFeHBnyUQZA60IlIi-EAH",7 "refresh_token_expires_in": 7776000,8 "scope": "r:awx_action:balances_view r:awx_action:settings.account_details_view r:awx_action:global_accounts_view",9 "token_type": "bearer"10}
Token rotation
Refresh tokens are single-use and must be rotated properly. Each successful refresh request generates a new refresh token and invalidates the previous one. You must:
- Always store the new refresh token immediately after receiving it.
- Use only the latest refresh token for subsequent refresh requests.
- Do not reuse an old refresh token, even if stored in multiple locations or retried from failed requests.
Grace period for error recovery
The previous refresh token remains valid for 60 seconds after a new token is issued. This grace period exists only to handle network failures or timeout scenarios where you're unsure if the refresh succeeded. Do not rely on this grace period for normal operations.
Security revocation: Attempting to reuse a refresh token outside the 60-second grace period will cause the entire token family to be revoked for security reasons, as this indicates potential token compromise. Your integration will be disconnected and the user must re-authorize.
Avoid concurrent refresh requests
Do not make multiple simultaneous refresh requests using the same refresh token. This can cause race conditions and token validation errors. Implement request queuing or locking in your application to ensure only one refresh request is in-flight at a time.
When tokens become invalid
Access tokens and refresh tokens may become invalid under the following circumstances:
- Expiration: Access tokens expire after 5 minutes; refresh tokens expire after 90 days. Always check the
expires_inandrefresh_token_expires_invalues. - User revocation: If a user disconnects your application in their Airwallex settings, all tokens are immediately invalidated.
- Admin role removal: If the user who granted consent loses admin permissions, token refresh will fail. See OAuth permissions and user roles for details.
- Token archival: Expired refresh tokens are archived after 90 days and cannot be recovered.
In all cases, you must prompt users to re-authorize your application through the authorization flow.
Recommended: Subscribe to the partner_connection.disconnected Webhook event to receive real-time notifications when a connection is invalidated. This allows your application to proactively detect disconnections and notify users, rather than discovering the issue when API calls fail.
Best practices for token management
To maintain a valid connection:
- Proactively refresh tokens every 60-80 days, well before the 90-day expiration.
- Monitor
refresh_token_expires_invalues and alert your operations team when tokens approach expiration. - Implement retry logic with exponential backoff for transient errors (500, 503).
- Do not retry 400-level errors with the same refresh token - these indicate permanent failures.
- Store tokens securely in a centralized database, not in multiple caches or application instances.
For detailed error handling and troubleshooting guidance, see Troubleshooting OAuth errors.
Next steps
Now that you've implemented OAuth authorization, complete your integration:
- Implement your use case using one of the integration guides (online payments, invoicing, bill payments, or bank feed).
- Set up webhook notifications to receive real-time updates about connected accounts.
- Test your integration thoroughly before going live.