# Quickstart: Your first online payment
Complete a minimal end-to-end online payment in the sandbox environment using [Airwallex.js](https://www.airwallex.com/docs/developer-tools/sdks/airwallex.js.md) and Airwallex-hosted payment page. By the end of this tutorial, you will have a working checkout page and a successful test payment in the sandbox.
You'll do the following:
- Authenticate to Airwallex and generate an access token.
- Create a PaymentIntent on your server.
- Build a checkout page that redirects to Airwallex-hosted payment page using Airwallex.js.
- Verify the result in the Airwallex web app, via API, or with webhooks.
> **\[INFORMATIONAL]**
>
> Airwallex AI tools can accelerate your integration. Connect your coding agent to the [developer connectors](https://www.airwallex.com/docs/developer-tools/ai/developer-connector.md) for Airwallex docs and SDK guidance while you build, then use the [Airwallex CLI](https://www.airwallex.com/docs/developer-tools/cli.md) for production reads and writes.
## Before you begin
- You must have a [sandbox account](https://www.sandbox.airwallex.com/global/signup) for testing.
- Payments must be enabled on your Airwallex account with at least one [payment method activated](https://www.airwallex.com/docs/payments/get-started/payment-method-activation.md) under **Payments** > **Payment methods** tab in the web app.
- You must have your Client ID and [API key](https://www.airwallex.com/docs/developer-tools/api/manage-api-keys.md) generated from **Developer** > **API keys** tab in the sandbox web app.
- You must be able to make HTTP requests from a backend server.
- Familiarize yourself with [Airwallex.js](https://www.airwallex.com/docs/developer-tools/sdks/airwallex.js.md).
## Step 1: Get an access token on your server
Payment APIs require an access token generated from your Client ID and API key.
**Request**
```shell
curl -X POST https://api.sandbox.airwallex.com/api/v1/authentication/login \
-H 'Content-Type: application/json' \
-H 'x-api-key: {{YOUR_SANDBOX_API_KEY}}' \
-H 'x-client-id: {{YOUR_SANDBOX_CLIENT_ID}}'
```
**Response**
```json
{
"token": "your_access_token",
"expires_at": "2025-12-31T23:59:59Z"
}
```
Save the `token` in your backend and reuse it until it expires.
> **\[WARNING]**
>
> Keep your Client ID, API key, and access tokens on your server only. Do not expose them in frontend code or mobile apps.
## Step 2: Create a PaymentIntent on your server
A PaymentIntent represents your intent to collect a specific amount from a shopper. Airwallex-hosted payment page uses it to render the checkout form and process the payment.
### End-to-end flow (sequence diagram)
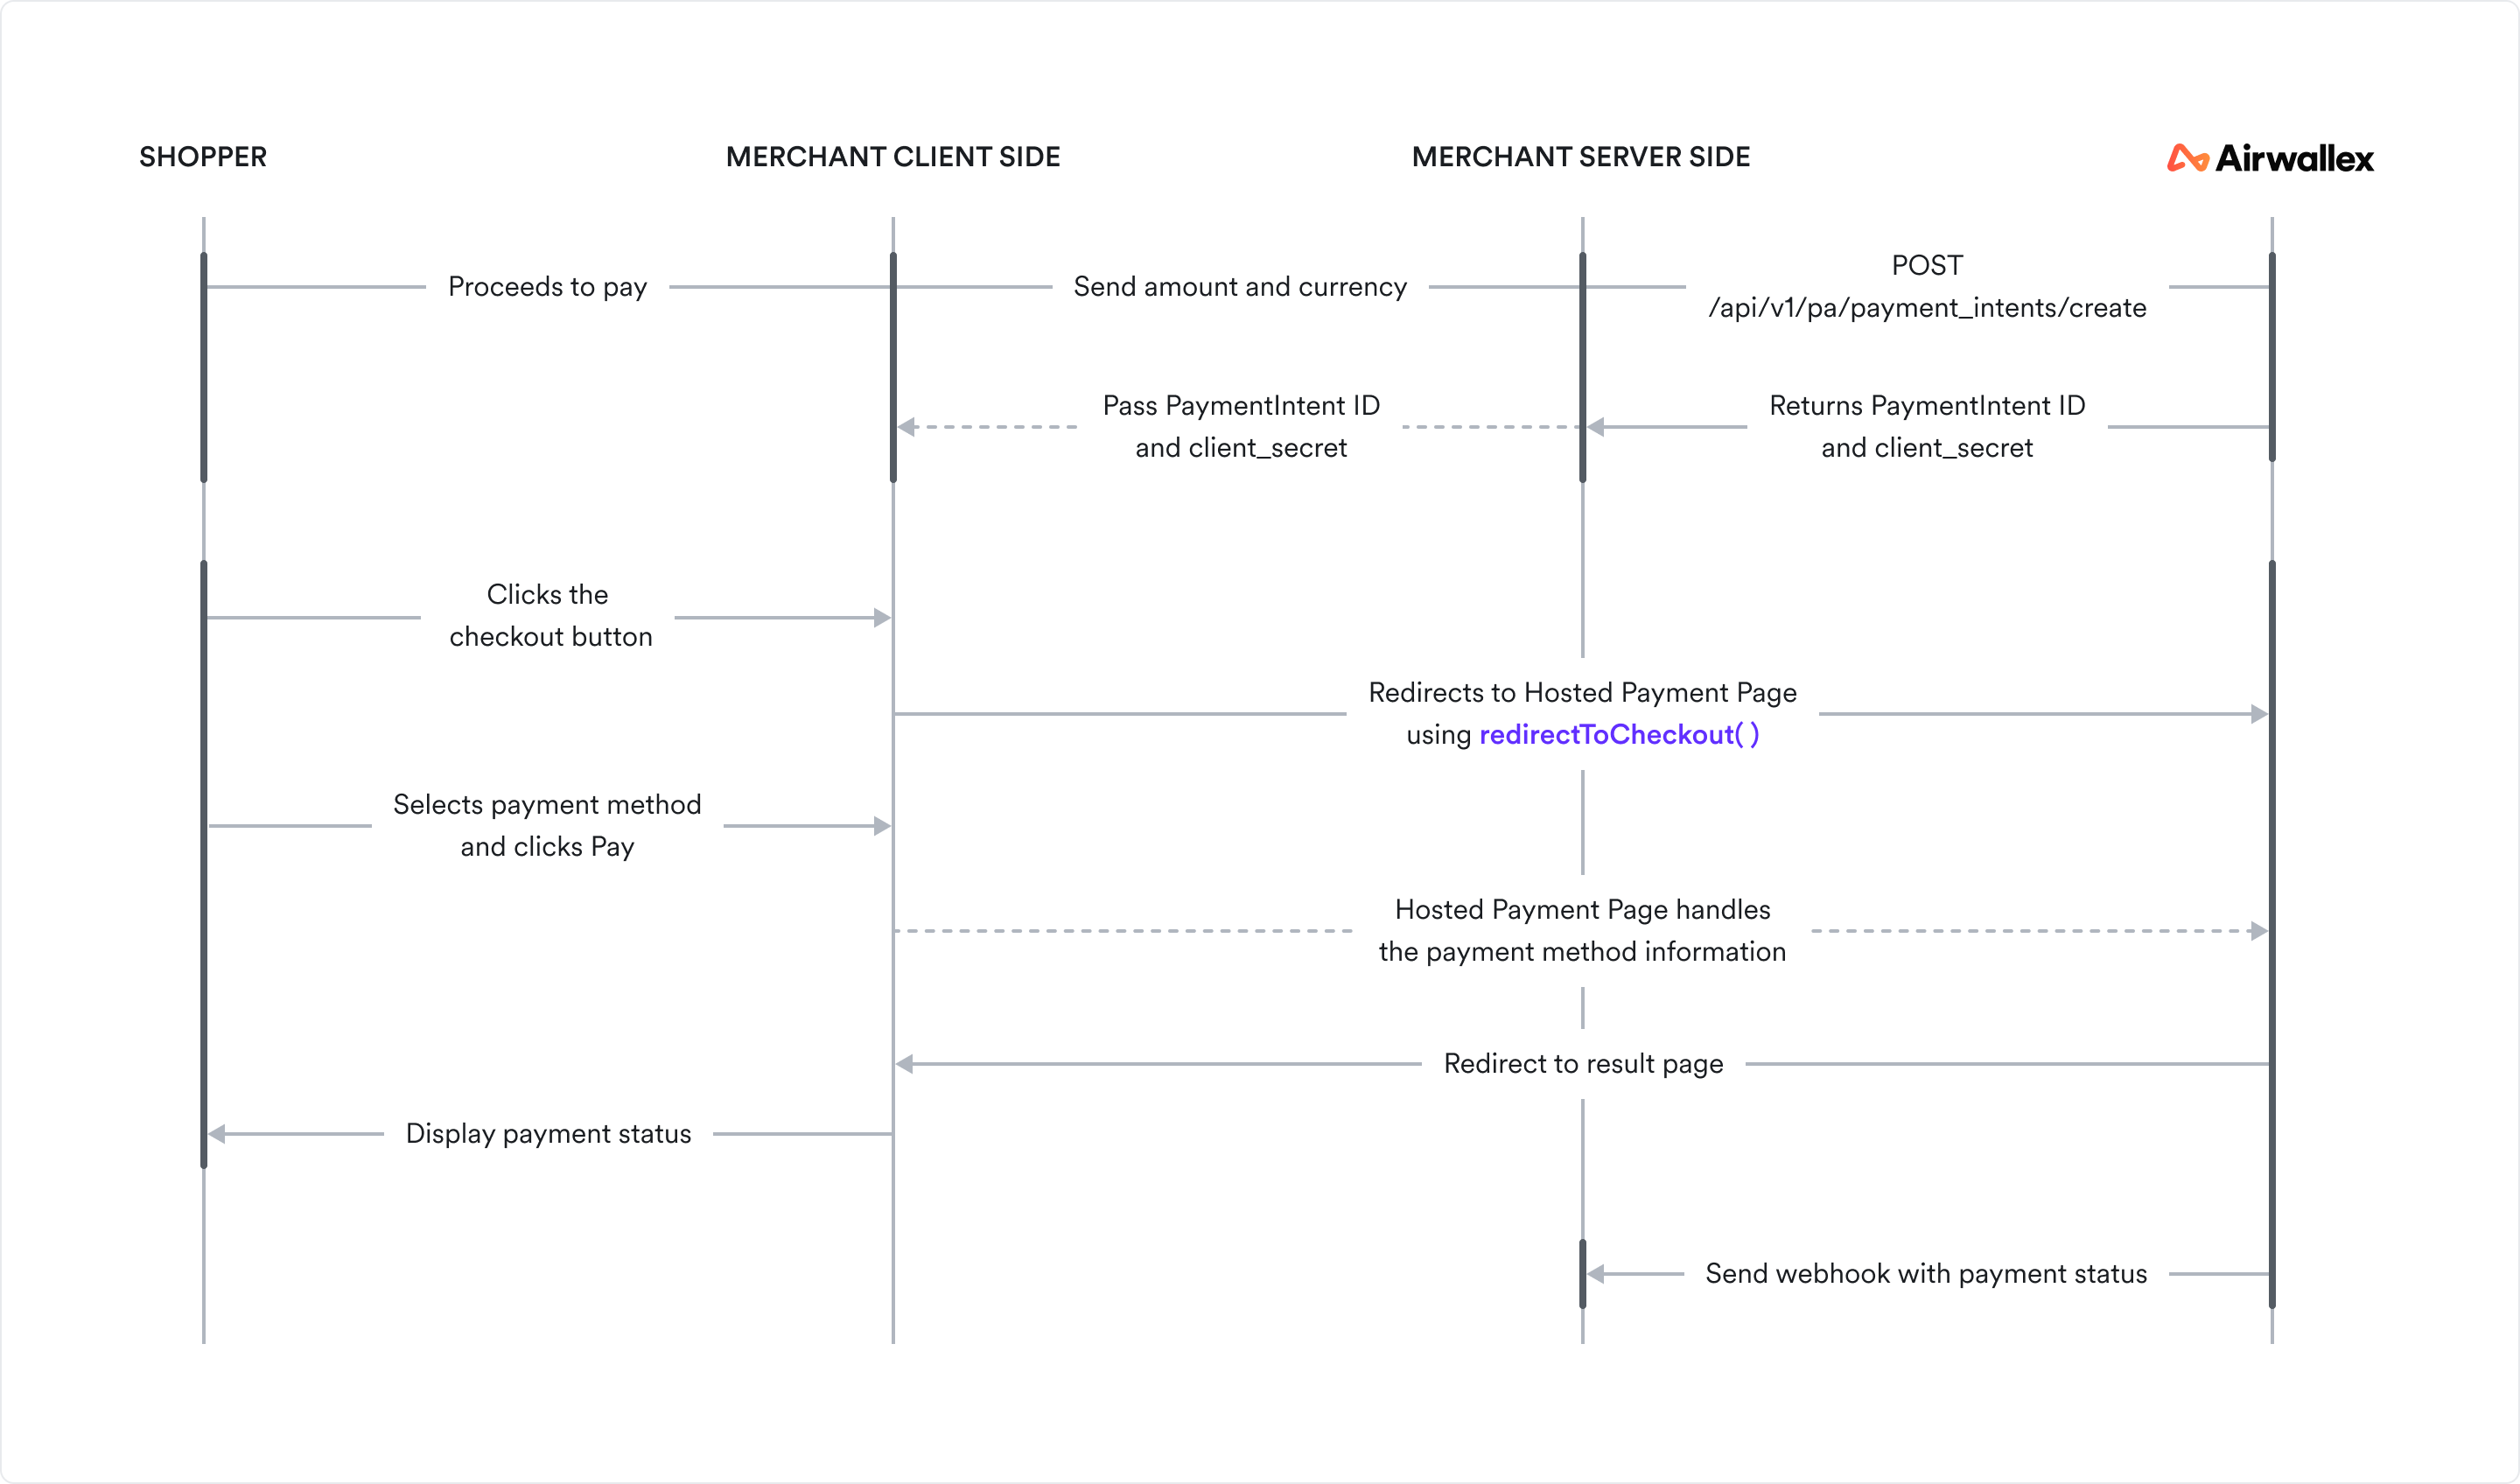
Call [Create a PaymentIntent](/api/payments/payment_intents/create) with `request_id`, `amount`, `currency`, and `merchant_order_id`. The `customer` object is optional but helps pre-fill the hosted checkout. Learn more about [PaymentIntents API](https://www.airwallex.com/docs/payments/get-started/using-payments-intent-api.md).
**Request**
```shell
curl -X POST https://api.sandbox.airwallex.com/api/v1/pa/payment_intents/create \
-H 'Authorization: Bearer {{ACCESS_TOKEN}}' \
-H 'Content-Type: application/json' \
-d '{
"request_id": "b01737e5-c5ab-4765-8834-cbd92dfeaf81",
"amount": 100,
"currency": "USD",
"merchant_order_id": "D202503210001",
"return_url": "https://www.airwallex.com",
"customer": {
"email": "customer@example.com",
"first_name": "John",
"last_name": "Doe"
}
}'
```
**Response**
The API returns a PaymentIntent object. See [Create a PaymentIntent](/api/payments/payment_intents/create) for the full response schema.
```json
{
"id": "int_your_payment_intent_id",
"request_id": "b01737e5-c5ab-4765-8834-cbd92dfeaf81",
"amount": 100,
"currency": "USD",
"merchant_order_id": "D202503210001",
"status": "REQUIRES_PAYMENT_METHOD",
"created_at": "2024-01-30T03:31:29+0000",
"updated_at": "2024-01-30T03:31:29+0000",
"client_secret": "your_client_secret"
}
```
For the checkout page in Step 3, you will need:
- `id`: The PaymentIntent ID
- `client_secret`: Used on the client side to complete the payment securely
## Step 3: Build a basic checkout page
Build a simple HTML page with a **Pay Now** button that redirects to the payment page hosted by Airwallex using [Airwallex.js](https://www.airwallex.com/docs/developer-tools/sdks/airwallex.js.md). Initialize the SDK and call `payments.redirectToCheckout()` when the shopper clicks the button.
### Add the SDK and a Pay Now button
```html
Quickstart checkout
Hosted payment page (HPP) integration
The following button redirects the customer to an Airwallex-hosted payment page.
```
Replace `replace-with-your-intent-id`, `replace-with-your-client-secret`, and `replace-with-your-currency` with the values from the PaymentIntent you created in Step 2, and set `successUrl` to your own HTTPS success page.
When the shopper clicks **Pay Now**:
1. They are redirected to a secure, Airwallex-hosted checkout page.
2. They can select a payment method, enter details, and complete any 3D Secure (3DS) authentication.
3. They are redirected back to your `successUrl` if configured, or to the PaymentIntent `return_url` otherwise.
## Step 4: Test with sandbox cards and verify the payment
### Use test cards in the sandbox
Use the [test card numbers](https://www.airwallex.com/docs/payments/test-and-go-live/test-card-numbers.md) to test various payment scenarios. Create a new PaymentIntent for each test case and use the new `id` and `client_secret` in the HTML page.
Run at least:
- One successful card payment.
- One failed payment (invalid card or insufficient funds).
- One 3DS scenario.
### Verify the PaymentIntent status
Verify that the payment worked in one of these ways:
1. **Airwallex web app**
Go to **Payments** > **Payments Activity** in the web app and confirm that your payments appear.
2. **Retrieve PaymentIntent via API**:
```shell
curl -G https://api.sandbox.airwallex.com/api/v1/pa/payment_intents/int_your_payment_intent_id \
-H 'Authorization: Bearer {{ACCESS_TOKEN}}'
```
Check for `status: "SUCCEEDED"` on a successful test payment.
3. **Webhooks (recommended for production)**
Configure a webhook endpoint for `payment_intent.succeeded` and related events. Use it to trigger order fulfillment, emails, or internal workflows instead of relying only on redirects. For details, see [Listen for webhook events](https://www.airwallex.com/docs/developer-tools/webhooks/listen-for-webhook-events.md).
## Next steps
- **Prepare for production**
Implement idempotency on create/confirm calls, add error handling for declines and network errors, and validate [3DS](https://www.airwallex.com/docs/payments/test-and-go-live/test-card-numbers#3ds-authentication-scenarios.md) flows in your key markets. See [Airwallex.js error codes](https://www.airwallex.com/docs/developer-tools/sdks/airwallex.js/error-codes.md).
- **Customize checkout**
Adjust appearance and layout using [`appearance`](/js/payments/dropin/#createElement.dropIn.parameters.options.appearance) and [`layout`](/js/payments/dropin/#createElement.dropIn.parameters.options.layout). See [Customize style and appearance](https://www.airwallex.com/docs/payments/integration-options/web-checkout/customize-appearance.md).
- **Try other integration options**
You can choose from a range of integration options based on your engineering capacity, PCI scope, and desired level of control. If you prefer a pre-built checkout block on your own page instead of a full-page redirect, see [Quickstart: Your first Drop-in element payment](https://www.airwallex.com/docs/payments/integration-options/web-checkout/drop-in-element/guest-user-checkout.md). To collect card details with a single-line [Card Element](https://www.airwallex.com/docs/payments/integration-options/web-checkout/embedded-elements/card-element.md) instead, see [Quickstart: Your first Card Element payment](https://www.airwallex.com/docs/payments/integration-options/web-checkout/embedded-elements/card-element/guest-user-checkout.md).
For more details on the available integration options, see [Web checkout overview](https://www.airwallex.com/docs/payments/integration-options/web-checkout.md).
- **Connect Billing and Invoicing**
Use [Billing Subscriptions](https://www.airwallex.com/docs/billing/subscriptions/get-started-with-subscription-management.md) for subscription lifecycle management and [Invoicing](https://www.airwallex.com/docs/billing/invoicing/get-started-with-invoicing.md) for one-off or recurring invoices with payment links. See [Recurring Payments](https://www.airwallex.com/docs/payments/about-airwallex-payments/recurring-payments.md).
Complete [Test your integration](https://www.airwallex.com/docs/payments/test-and-go-live/test-card-numbers.md) to prepare a production-ready integration that meets your risk, reporting, and operational requirements.